
FMEA in practice
Manual — Punch list (GQE) · chapter 12 of 13 · download the manual as PDF
Chapter 11 introduced the FMEA as one of the three methods of the Root cause analysis block. This chapter is the user guide: how to score Severity, Occurrence and Detection with the company scales, how to read the RPN and the action threshold, how to record the re-evaluation after the action, and how the project Pareto by RPN turns the lines of several items into a priority list. The thread is the same item as in the previous chapter — the CRAC-02 failed at L1 (FAT) — and, for the re-evaluation, the CRAC-03 failed at L2 (SAT).- Use the FMEA when the item involves an equipment or system with several ways to fail — a CRAC, a switchboard, a UPS, a fire loop — and the question is not only “why did it fail?” but “what else can fail, how badly, and what would catch it first”. For a simple execution deviation, the 5 Whys are enough.
- The FMEA is the analysis that best survives time: the lines that stayed below the threshold remain on record as known and accepted risks, and the re-evaluation proves to the client that the recommended action reduced the risk — which is what commissioning inspection asks for.
- Everything that applies to the other methods applies here: whoever can edit the item fills it in; Save records, Conclude analysis locks, Reopen unlocks; an item born from a commissioning failure can only be completed with a concluded analysis.
The three scales
Section titled “The three scales”Each FMEA line gets three scores from 1 to 10. Severity (S) measures the effect if the failure happens — it does not change with the action, only with a design change. Occurrence (O) measures the probability of the cause — it drops when the cause is eliminated. Detection (D) measures the chance that the current controls catch the failure before it affects operation — and here the scale is inverted: 1 is the best (always detected) and 10 the worst (no control). The Severity, occurrence and detection scales button, right above the table, opens the three side by side; keep it open during the meeting.
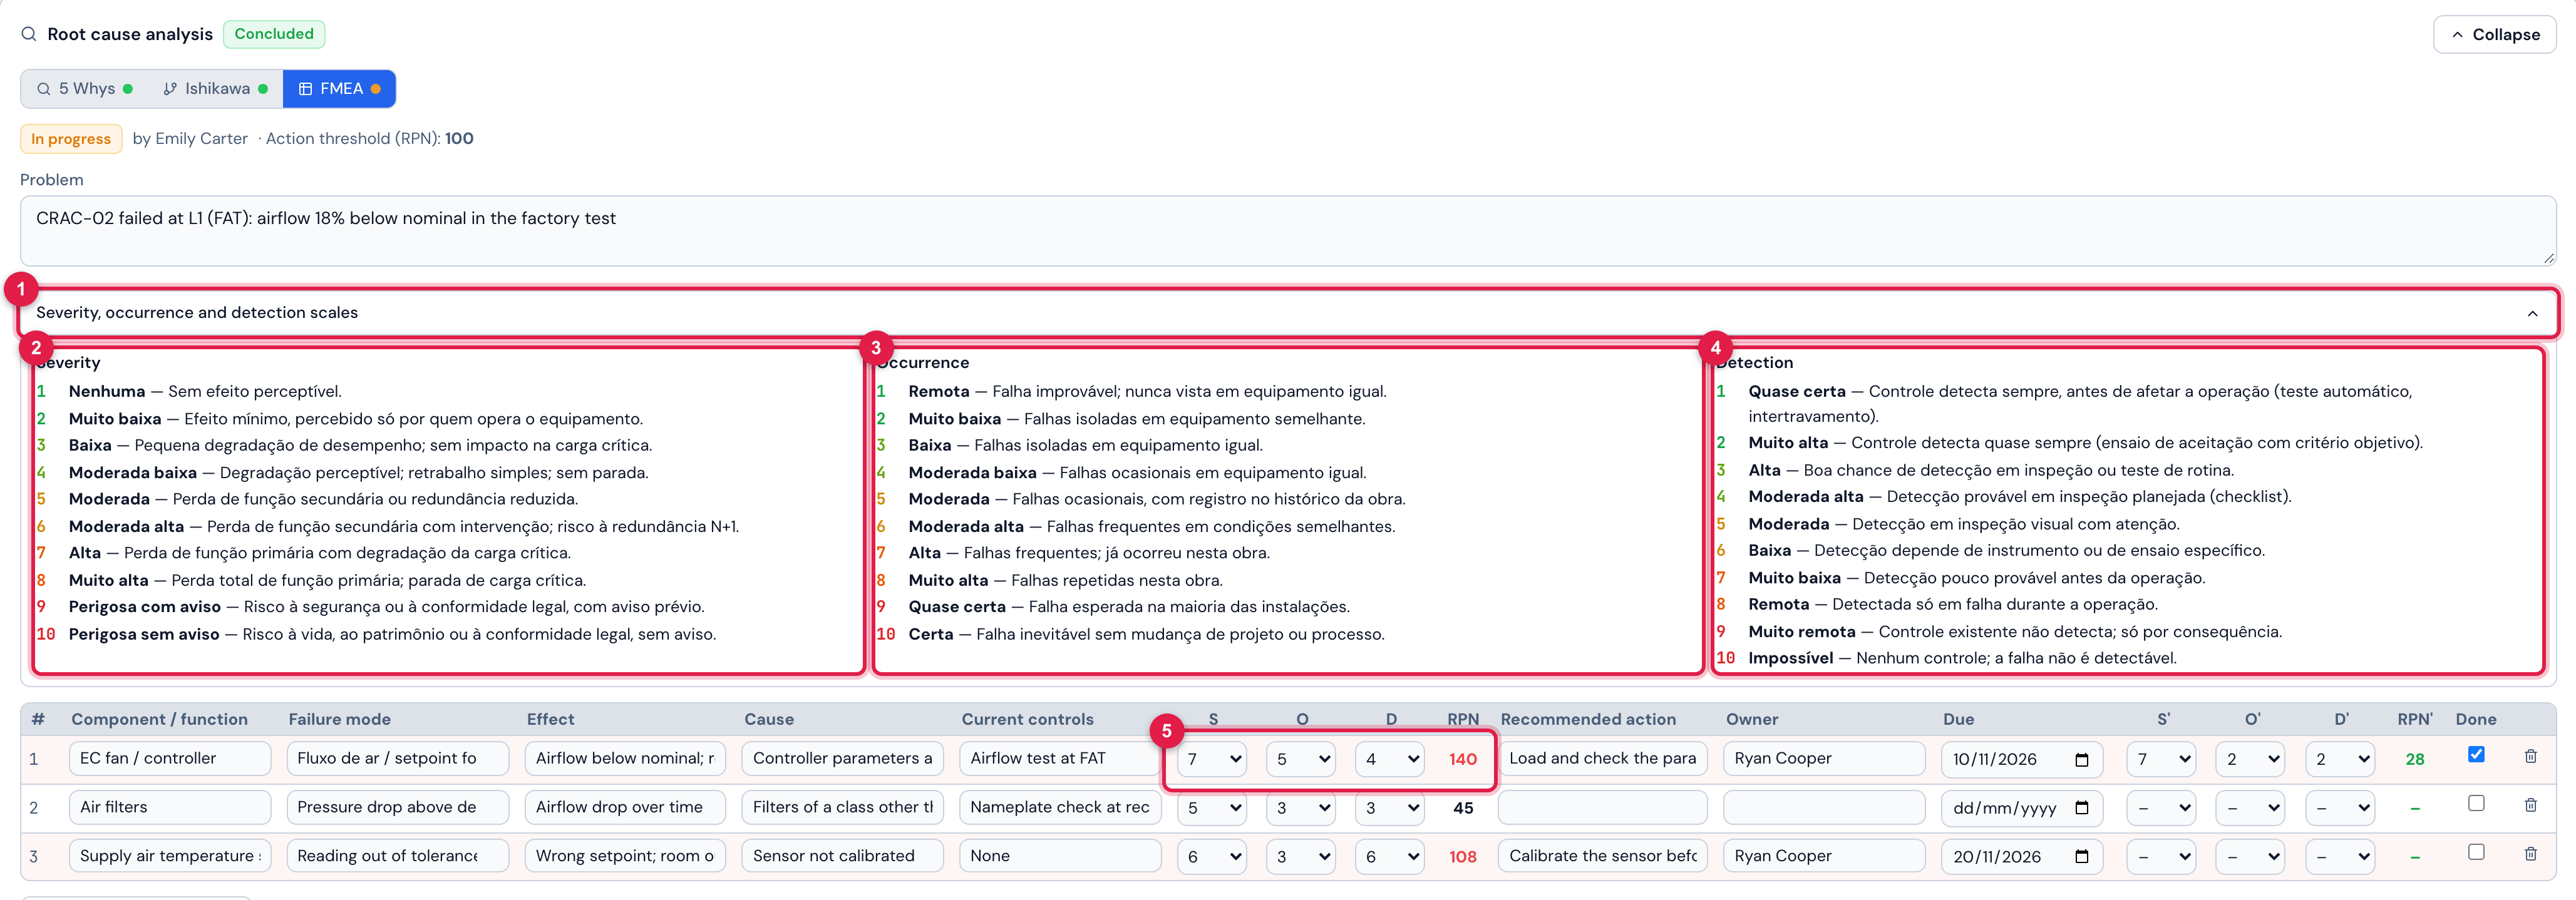
Figure 27. The FMEA of the item from the CRAC-02 failure at L1 with the Severity, occurrence and detection scales panel open: score, label and criterion of each scale, and the scores already given on the first line.
- 1The Severity, occurrence and detection scales button, clicked: the panel opens below it; click again to collapse.
- 2Severity: the score in color (green → red), the label and the criterion from 1 to 10.
- 3Occurrence: same form, read from the line’s cause.
- 4Detection: 1 is the best control, 10 is none.
- 5The S, O and D scores of the first line (7, 5 and 4) and the RPN 140, in red because it crossed the threshold; hovering the chosen score shows the criterion as a tooltip.
The default criteria, score by score (the company catalog is registered in Portuguese and the screen shows it as registered; the translation below is for reading). The score color in the panel follows the same ruler on the three scales: 1–2 green, 3–4 olive, 5–6 amber, 7–8 orange, 9–10 red.
| Score | Severity — the effect, if the failure occurs | Occurrence — the probability of the cause | Detection — the chance that the current control catches it first |
|---|---|---|---|
| 1 | None — no perceptible effect. | Remote — failure unlikely; never seen on identical equipment. | Almost certain — the control always detects, before affecting operation (automatic test, interlock). |
| 2 | Very low — minimal effect, noticed only by whoever operates the equipment. | Very low — isolated failures on similar equipment. | Very high — the control almost always detects (acceptance test with an objective criterion). |
| 3 | Low — small performance degradation; no impact on the critical load. | Low — isolated failures on identical equipment. | High — good chance of detection in a routine inspection or test. |
| 4 | Moderate low — perceptible degradation; simple rework; no shutdown. | Moderate low — occasional failures on identical equipment. | Moderate high — detection likely in a planned inspection (checklist). |
| 5 | Moderate — loss of a secondary function or reduced redundancy. | Moderate — occasional failures, recorded in the project history. | Moderate — detection in a careful visual inspection. |
| 6 | Moderate high — loss of a secondary function requiring intervention; risk to the N+1 redundancy. | Moderate high — frequent failures under similar conditions. | Low — detection depends on an instrument or a specific test. |
| 7 | High — loss of the primary function with degradation of the critical load. | High — frequent failures; already happened on this project. | Very low — detection unlikely before operation. |
| 8 | Very high — total loss of the primary function; critical load shutdown. | Very high — repeated failures on this project. | Remote — detected only as a failure during operation. |
| 9 | Hazardous with warning — risk to safety or legal compliance, with prior warning. | Almost certain — failure expected in most installations. | Very remote — the existing control does not detect; only by consequence. |
| 10 | Hazardous without warning — risk to life, property or legal compliance, without warning. | Certain — failure unavoidable without a design or process change. | Impossible — no control; the failure is not detectable. |
- Score Severity from the effect written in the Effect column, Occurrence from the cause in the Cause column and Detection from the controls in the Current controls column — if that column is empty (“None”), Detection is 9 or 10. Filling the three text columns before the scores avoids scoring “by feel”.
- Score one line at a time, the three scores in sequence, and do not compare RPNs halfway: the RPN is a consequence, not a target.
- A blank score leaves the line’s RPN as – (zero): the line does not count for concluding nor for the Pareto until it has all three.
A complete example: the CRAC-02 failed at L1
Section titled “A complete example: the CRAC-02 failed at L1”The item from chapter 11 was born from the CRAC-02 failure at L1 — FAT: airflow 18% below nominal in the factory test. The FMEA meeting listed three failure modes — the one that failed and two the same test could have let through — and scored them like this:
| # | Component / function | Failure mode | Effect | Cause | Current controls | S | O | D | RPN |
|---|---|---|---|---|---|---|---|---|---|
| 1 | EC fan / controller | Fluxo de ar / setpoint fora do projeto (catalog: airflow / setpoint off design) | Airflow below nominal; room without design capacity | Controller parameters at factory default | Airflow test at FAT | 7 | 5 | 4 | 140 |
| 2 | Air filters | Pressure drop above design | Airflow drop over time | Filters of a class other than specified | Nameplate check at receiving | 5 | 3 | 3 | 45 |
| 3 | Supply air temperature sensor | Reading out of tolerance | Wrong setpoint; room out of range | Sensor not calibrated | None | 6 | 3 | 6 | 108 |
Why those scores — reading the scales, line by line:
- Line 1 — S 7: “loss of the primary function with degradation of the critical load” — a CRAC without the design airflow does not stop the room, but leaves the load without the contracted capacity. O 5: “occasional failures, recorded in the project history” — factory parameters had already shown up in another delivery. D 4: “detection likely in a planned inspection” — the FAT airflow test catches it, but only at the end, and it did. RPN = 7 × 5 × 4 = 140.
- Line 2 — S 5: reduced redundancy, no shutdown. O 3: isolated failures on identical equipment. D 3: the filter nameplate check at receiving is a routine inspection. RPN = 45: below the threshold, risk accepted and recorded.
- Line 3 — S 6: a wrong setpoint compromises the room’s N+1 redundancy. O 3: isolated. D 6: “detection depends on an instrument or a specific test” — there is no control today (“None”), only calibration would prove it. RPN = 108: crosses the threshold without ever having failed — that is the merit of the FMEA: line 3 gets an action before it becomes an item.
- Lines 1 and 3 turn red and get a Recommended action, an Owner and a Due date (line 1: load and check the parameter list before the test; line 3: calibrate the sensor before L3). Line 2 stays as it is.
The action threshold
Section titled “The action threshold”The Action threshold (RPN) appears in the analysis header (default 100). A line with an RPN equal to or above it gets its background and number in red, and the caption below the table repeats the rule: Highlighted line: RPN at or above 100 requires action. RPN = S × O × D (1 to 10 each).
- The mark is stored with the line: in the project detailed PDF and in the NCR form the line is printed with “S · O · D · RPN” and the suffix (priority); the re-evaluation is printed as Re-evaluation S · O · D · RPN.
- The threshold also judges the re-evaluation: the RPN′ shows in red if it is still at or above the threshold and in green if it dropped below.
- The value is a company setting (
fmea_rpn_threshold) with no screen: ask support to change it. 100 is the classic value; companies working with harsher scales use 80 or 120.
Re-evaluating after the action
Section titled “Re-evaluating after the action”The recommended action only counts once it is proven to have reduced the risk. After the due date, the same line gets the S′, O′ and D′ scores (Re-evaluation after the action) and the Done mark; the RPN′ is computed on the spot. Usually S′ = S (the gravity of the effect does not change with a process action), Occurrence drops when the cause was eliminated and Detection improves when the action added a control. If the analysis was already concluded, Reopen, fill in, mark Done and Conclude analysis again.
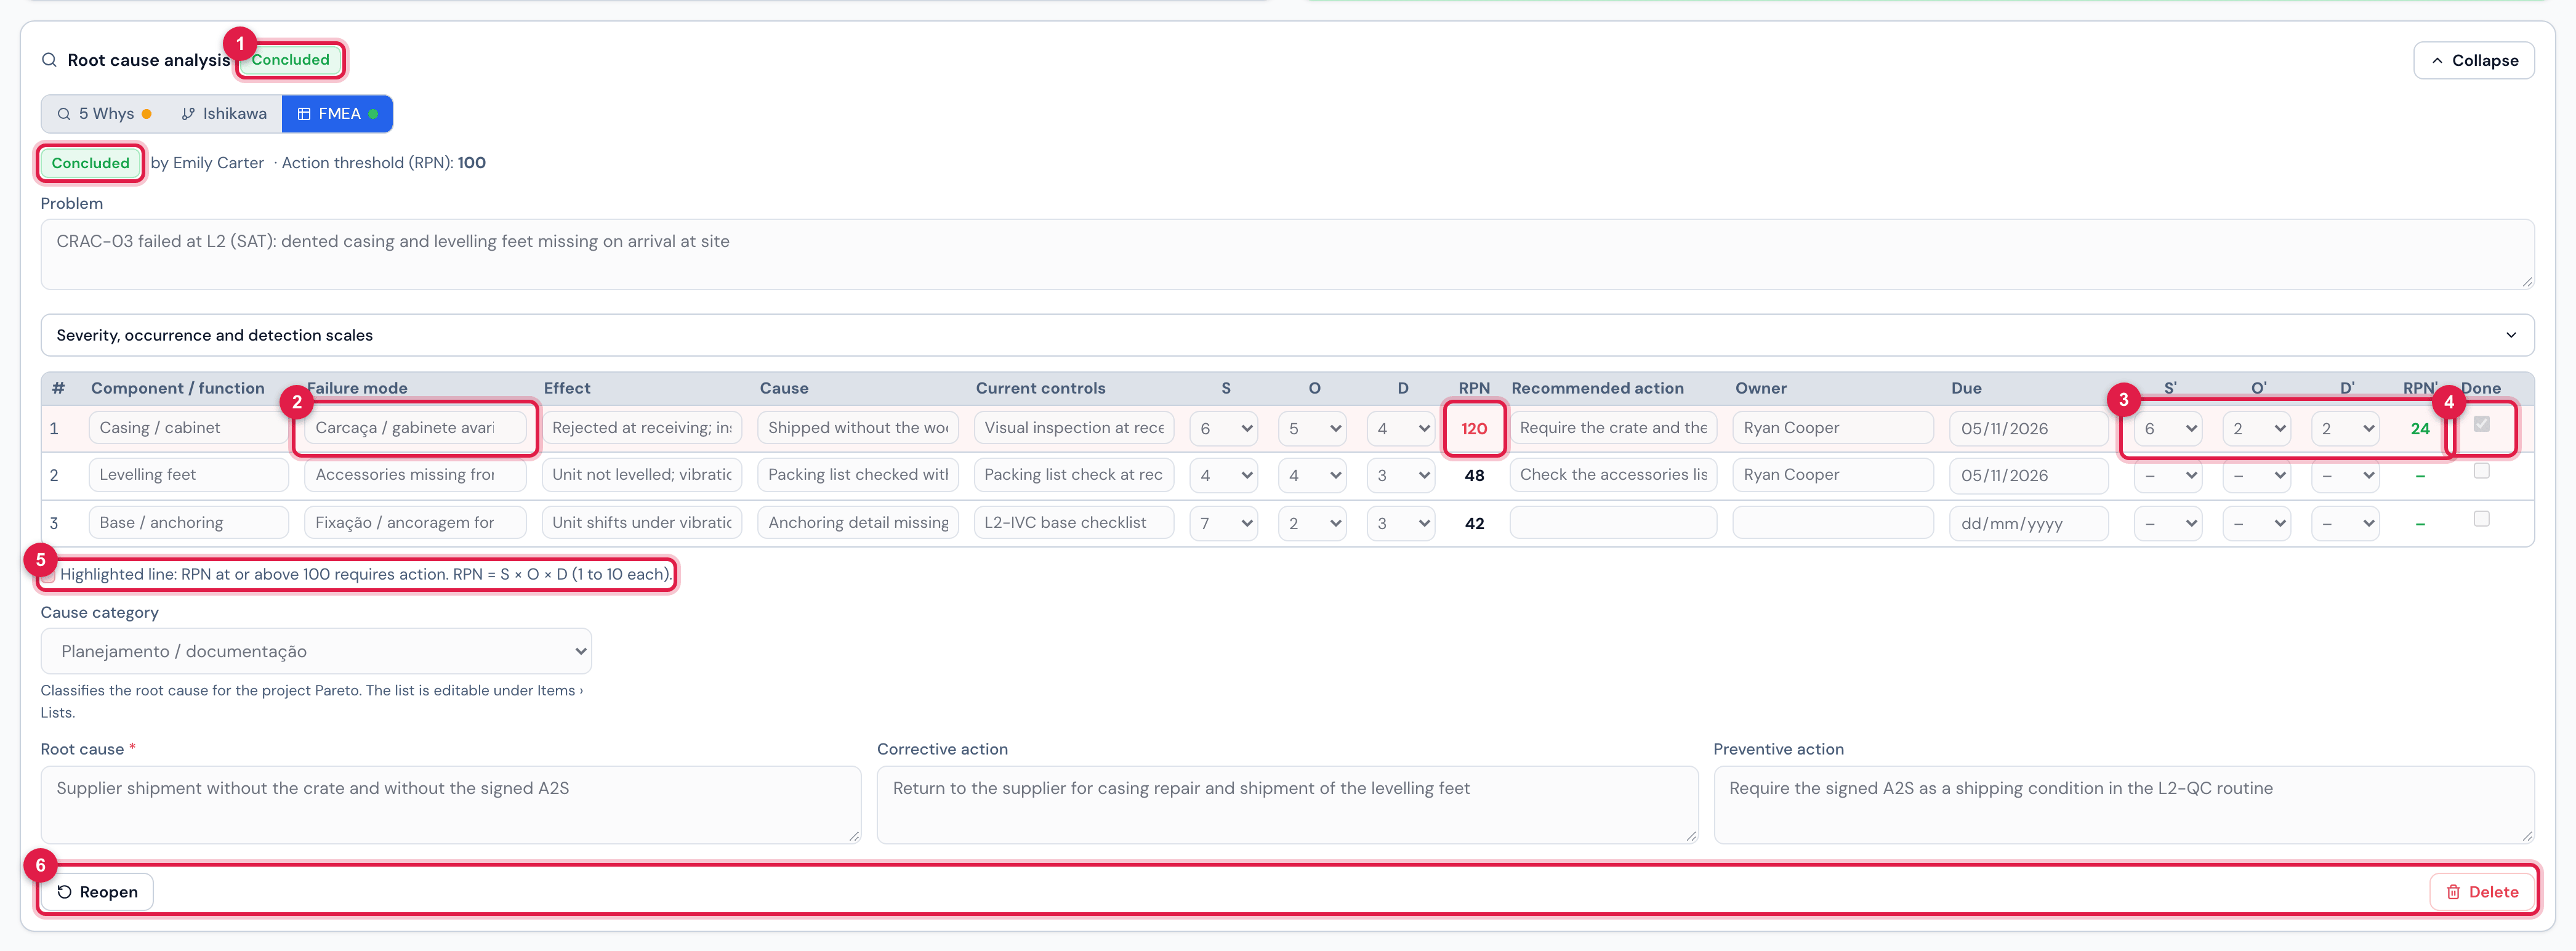
Figure 28. The concluded FMEA of the item from the CRAC-03 failure at L2: the first line crossed the threshold, got an action, was re-evaluated and marked Done; the other two stayed below the threshold.
- 1The Concluded badge on the block title and on the analysis header (green dot on the FMEA method).
- 2The priority line: Carcaça / gabinete avariado (casing / cabinet damaged), S 6 × O 5 × D 4 = RPN 120, in red.
- 3The re-evaluation S′ O′ D′ = 6, 2 and 2 → RPN′ 24, in green: Severity stayed, Occurrence and Detection dropped with the crate and the loading photo now required in the A2S.
- 4Done: the recommended action was carried out on time.
- 5The threshold caption, with the company value.
- 6Concluded, the analysis shows only Reopen and Delete; every field is locked.
- Conclude analysis requires the Root cause written (Fill in the root cause before concluding.) and at least one line with the three scores — which is what gives an RPN above zero (Register at least one failure mode before concluding.). Lines without failure mode, effect, component and scores are discarded on save.
- The RPN′ is only computed with the three new scores; two of them leave the column as –. Done without a re-evaluation is allowed, but proves nothing: do both together.
- Reopening to re-evaluate does not erase who concluded the first time: the item history keeps both conclusions.
- Conclude the FMEA before the re-evaluation, not after: the commissioning failure item needs a concluded analysis to be completed (chapter 8), and the re-evaluation usually comes weeks later.
The project Pareto by RPN
Section titled “The project Pareto by RPN”On the items screen, with a project selected, the Pareto card has the dimension By RPN (FMEA): instead of counting items, it adds up the RPN of each line of the project’s FMEAs. Each bar is one failure mode of one item (“mode — #number”), and its height is the line’s RPN — or the RPN′, if it has already been re-evaluated. It is the priority list of the whole project, ordered by risk, and it shows at once what the re-evaluation took off the top.
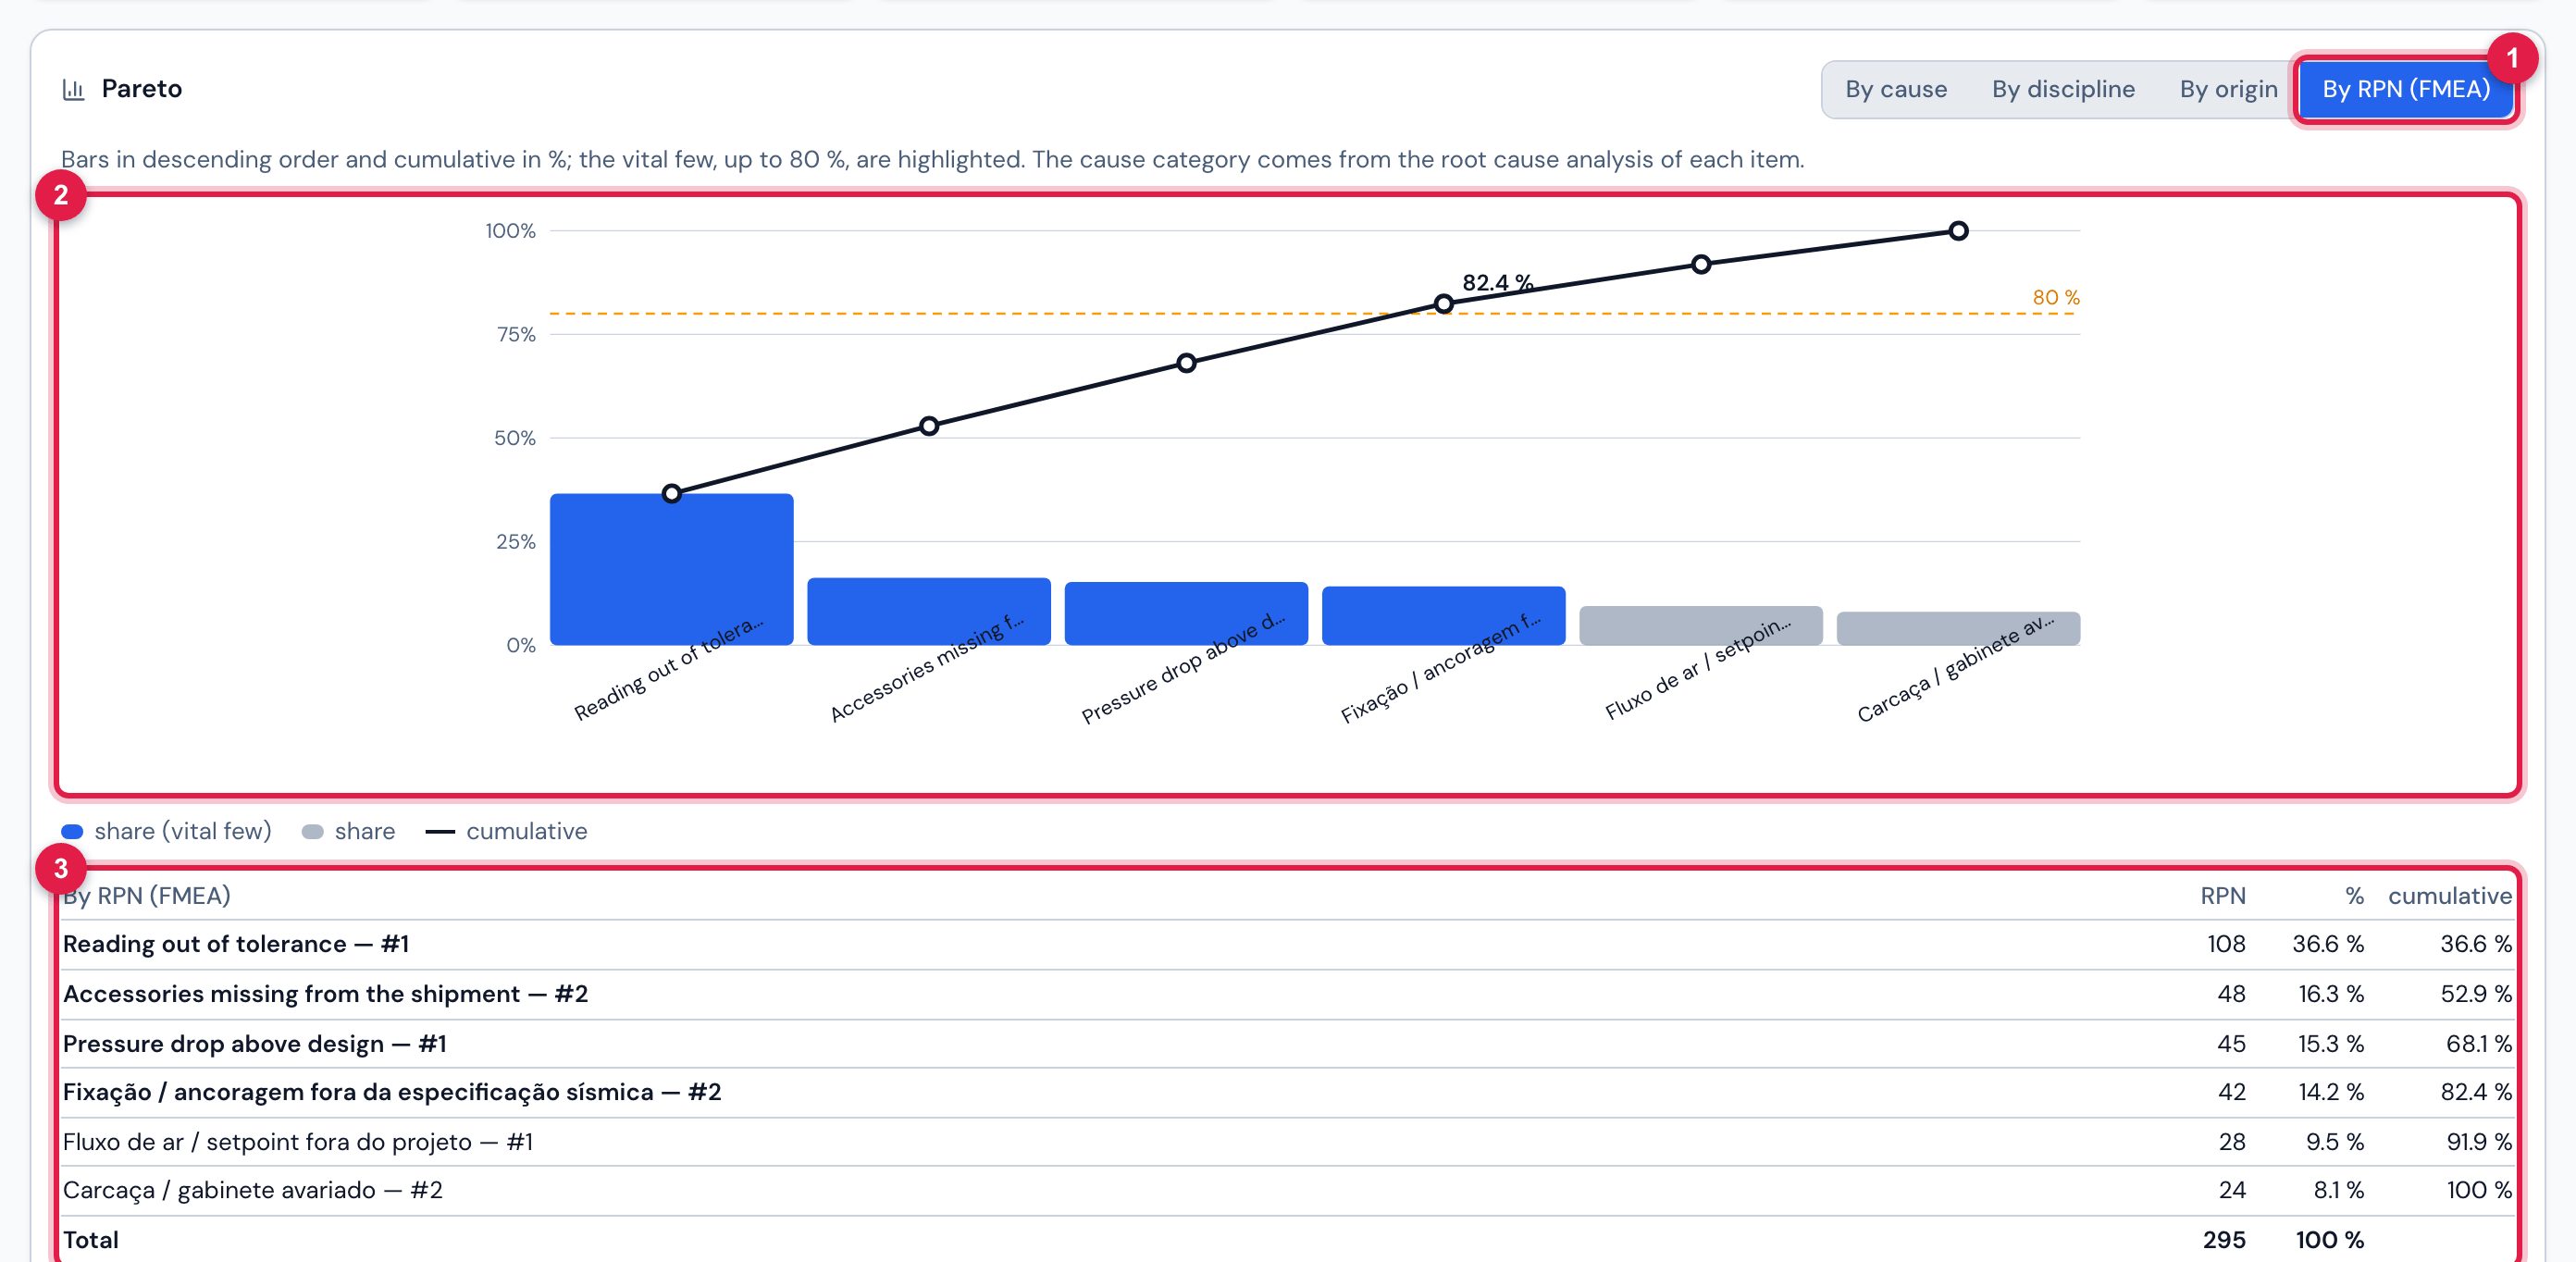
Figure 29. The Pareto of the commissioning project in the By RPN (FMEA) dimension: the FMEA lines of the CRAC-02 and the CRAC-03, ordered by RPN.
- 1The By RPN (FMEA) dimension.
- 2One bar per failure mode and item, in descending order of RPN: the CRAC-02 supply air sensor enters with 108 and the re-evaluated CRAC-03 line with 24, not 120. The bar height is the RPN’s share of the total; the line is the cumulative %.
- 3The table: the RPN column in place of the count, the share and the cumulative.
- Lines with an RPN above zero from all FMEA analyses of the project items are included, in progress or concluded; deleted analyses are not.
- The list’s open only chip applies here too: on, only the FMEAs of open items; off, those of every item of the project.
- Lines with the same failure mode on different items are different bars (the label carries the item number): the Pareto by RPN answers “which line to treat first”, not “which mode repeats” — for that, use By cause with the cause category.
The company lists
Section titled “The company lists”The scales and the catalog are lists under Items › Lists (chapter 10; the screens are in figures 25 and 26 of chapter 11). H2O seeds the defaults once per company; from then on, what Quality edits is what the FMEA shows.
- Severity (FMEA), Occurrence (FMEA) and Detection (FMEA): one row per score; the name starts with the score (“7 — Alta”) and the description is the criterion of the panel. Renaming the label and rewriting the criterion is free; keep the score at the start of the name, because that is what enters the RPN. Deactivating a score removes it from the selector (old analyses keep the score).
- Failure modes (FMEA): the catalog suggested while typing in the Failure mode column; the description is the group. The field accepts free text — “Accessories missing from the shipment” on the CRAC-03 is not in the catalog — and free text does not enter the catalog by itself: add it to the list if it is going to repeat.
- With no scale registered (whole list deactivated), the selector offers 1 to 10 without criteria and the panel warns No scale registered: use 1 to 10.
The default catalog, by group (names as registered, in Portuguese, with a translation for reading):
| Group | Failure modes |
|---|---|
| Elétrica (electrical) | Conexão elétrica frouxa / sem torque (loose / untorqued connection) · Sequência de fases invertida (reversed phase sequence) · Isolamento abaixo do mínimo (insulation below minimum) · Proteção / disjuntor mal ajustado (protection / breaker misadjusted) · Aterramento / equipotencialização ausente (earthing / bonding missing) · UPS não transfere / bateria fora de spec (UPS does not transfer / battery out of spec) · Gerador não parte / não assume carga (generator does not start / take load) |
| Climatização (cooling) | Vazamento de fluido refrigerante (refrigerant leak) · Fluxo de ar / setpoint fora do projeto (airflow / setpoint off design) · Condensadora obstruída / sem limpeza (condenser blocked / not cleaned) |
| Incêndio (fire) | Detector / laço de incêndio sem resposta (detector / fire loop not responding) |
| Mecânica (mechanical) | Fixação / ancoragem fora da especificação sísmica (fixing / anchoring outside seismic spec) · Carcaça / gabinete avariado (casing / cabinet damaged) |
| Documentação (documentation) | TAG / identificação ausente ou errada (TAG / identification missing or wrong) |
| Segurança eletrônica (electronic security) | Controle de acesso / câmera sem comunicação (access control / camera without communication) |
Script for an FMEA meeting
Section titled “Script for an FMEA meeting”A useful FMEA is done as a group, in a 45- to 90-minute session per equipment, with the screen projected. The script below follows the order of the columns.
- Before: call in those who know the equipment — engineering, commissioning, supplier, operations — and check under Items › Lists that the scales and the catalog say what your company means.
- Open the item, the Root cause analysis block, the FMEA method and Start analysis. Rewrite the Problem as an observable fact (the item title comes pre-filled).
- Open Severity, occurrence and detection scales and keep the panel open.
- List the failure modes, one per line, starting from the catalog and asking “what else could this test have let through?”; fill in Component / function.
- For each line, write Effect, Cause and Current controls — what today would prevent or detect the failure. Only then score.
- Give S from the effect, O from the cause and D from the controls, reading the criterion; discuss until consensus and do not average. The RPN appears on its own.
- For the lines in red, write the Recommended action, the Owner and the Due date; for the others, decide as a group whether the risk is accepted (and leave the line as a record).
- Pick the Cause category, write the Root cause, the Corrective action and the Preventive action; Save and Conclude analysis.
- After the due date: Reopen, give S′ O′ D′, mark Done and Conclude analysis again.
- On the project screen, follow Pareto › By RPN (FMEA): what stayed at the top is the agenda of the next meeting.
Was this page helpful?
Thanks for the feedback!
Got it — we will improve this page.