
Creating a schedule
Manual — Automatic Scheduling · chapter 3 of 8
In Planning › Automatic Scheduling, click New Schedule. The wizard has four steps — General, Assets, Plans and Confirmation — and nothing is saved until the Generate Schedule button of the last step. Next is only enabled when the step is complete; Back goes back without losing what was filled in.Step 1 — General
Section titled “Step 1 — General”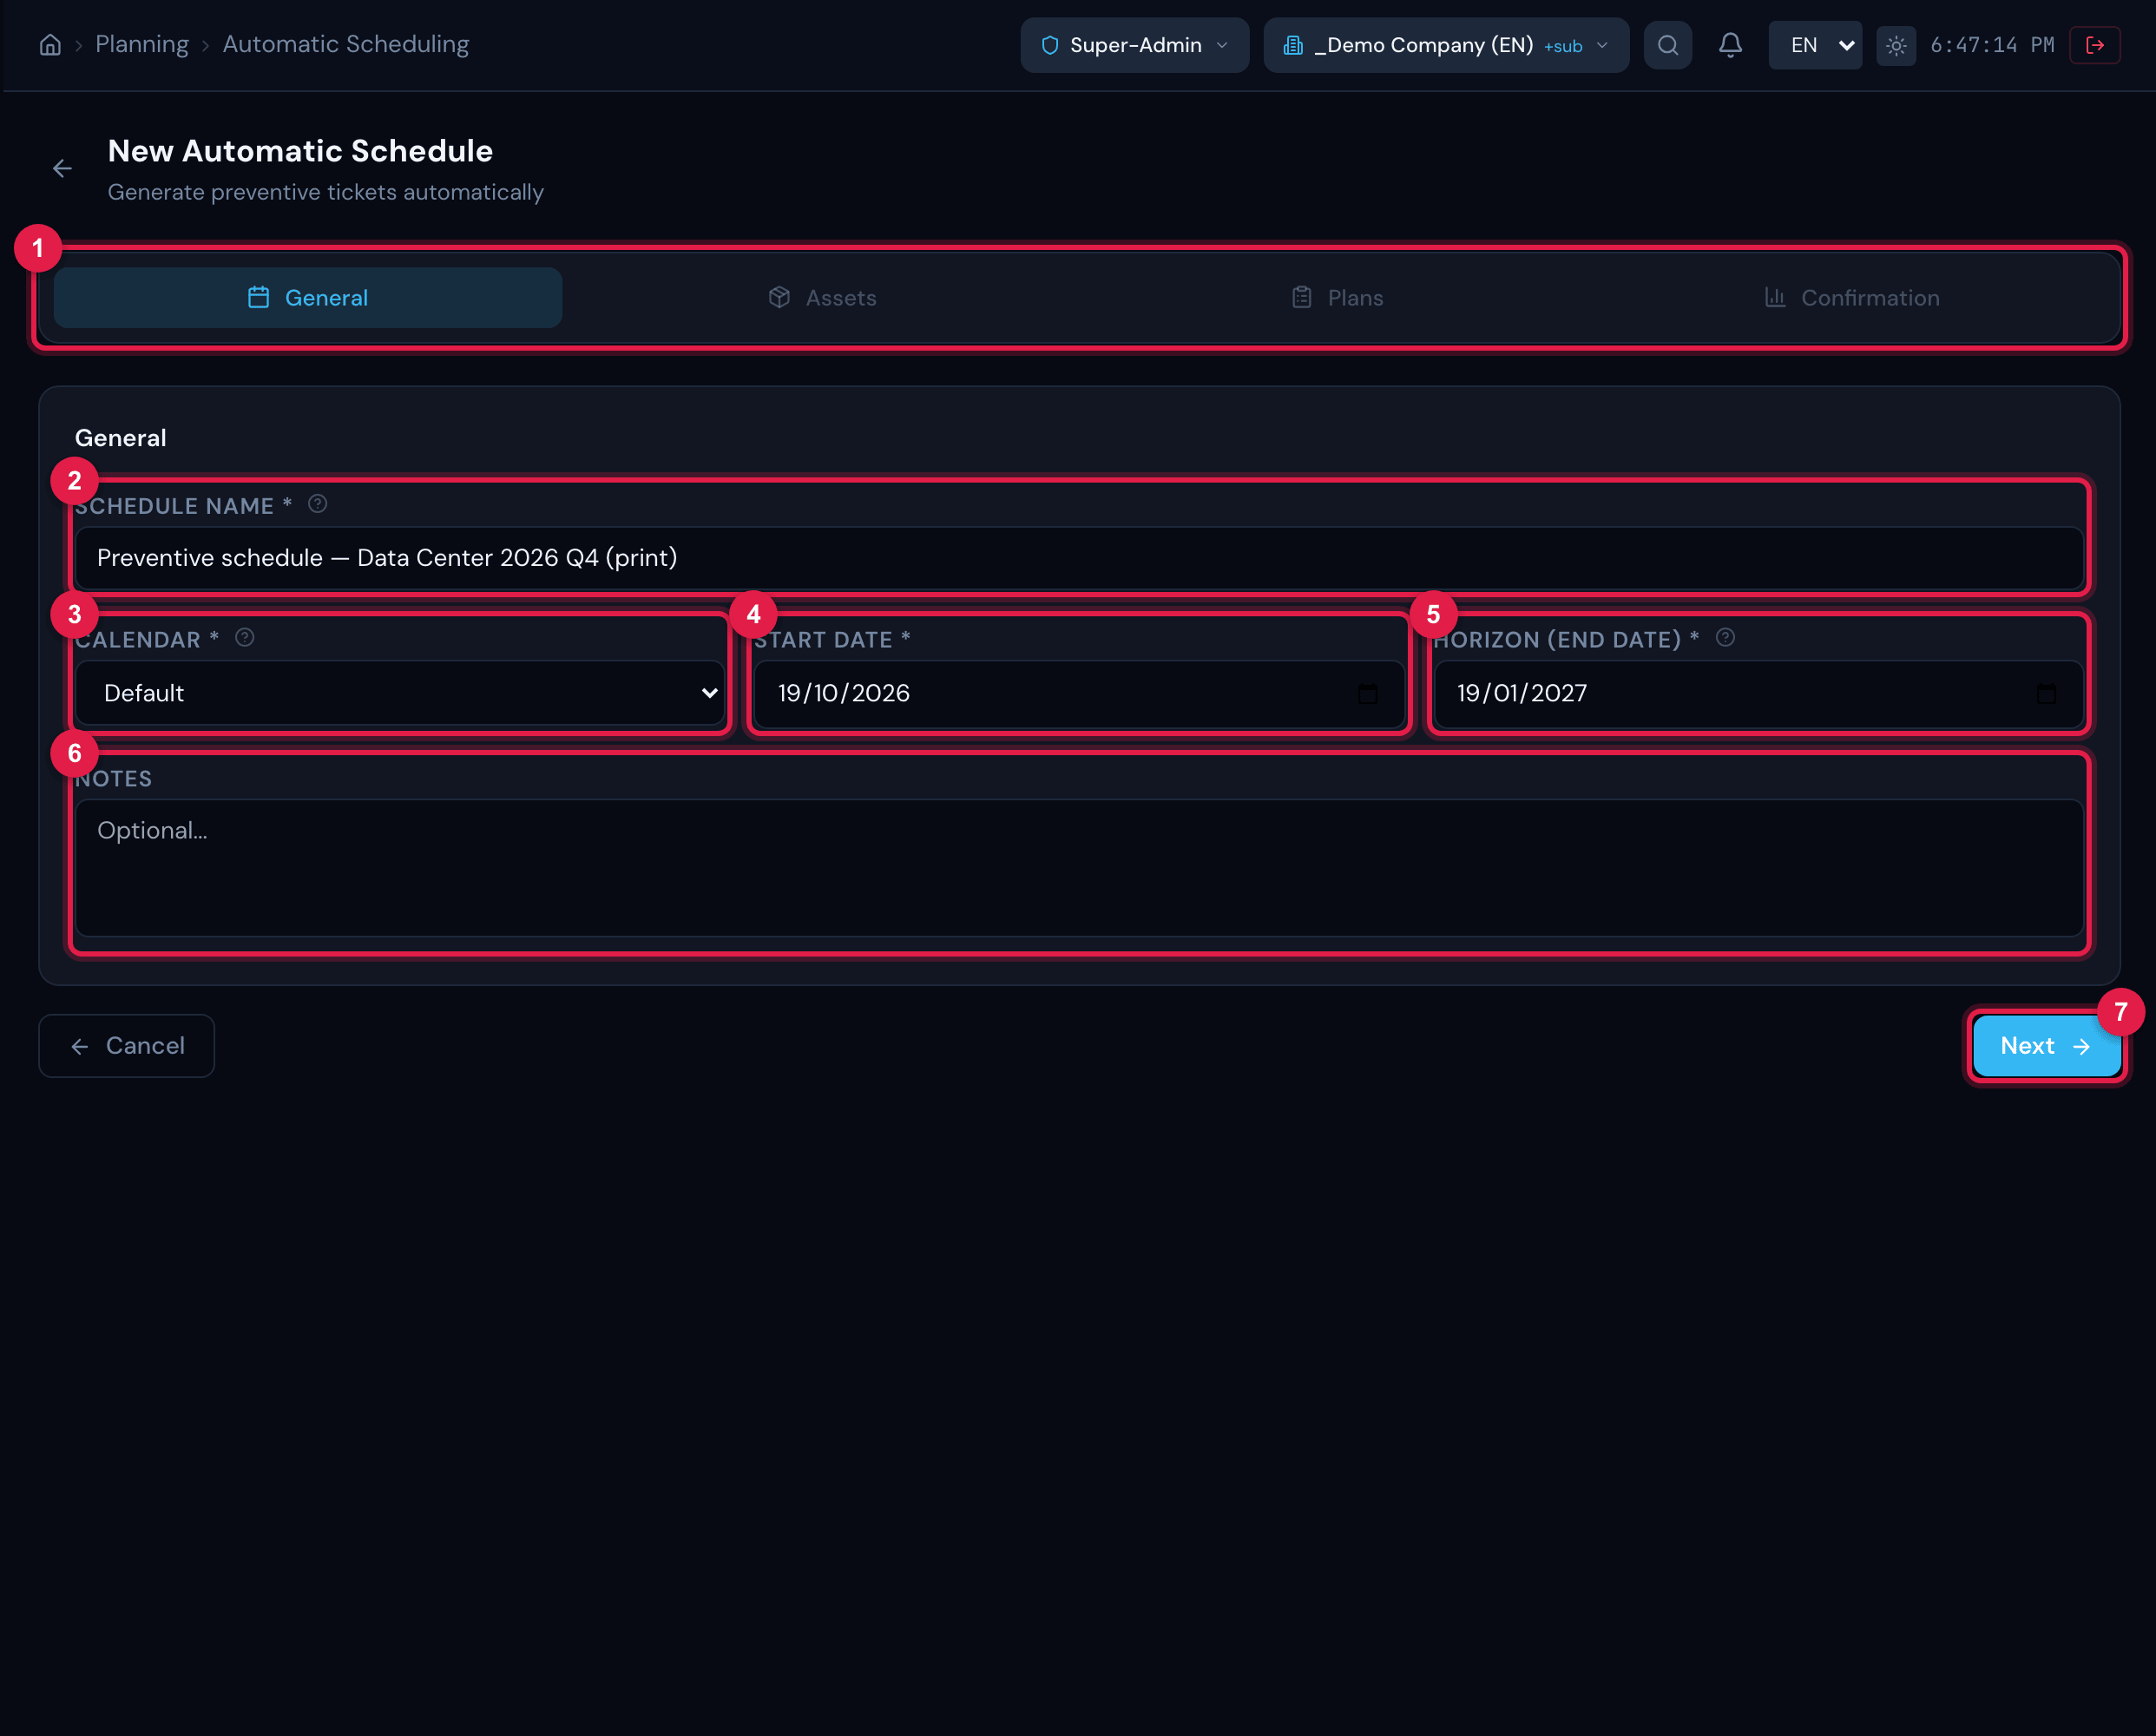
Figure 4. New Automatic Schedule, step General: name, calendar, start date, horizon and notes.
- 1The four steps — the current one highlighted; the ones already done get a check mark and can be reopened.
- 2Schedule Name — e.g. “Preventive schedule — Data Center 2026 Q4”.
- 3Calendar — required; the company’s calendars (chapter 2).
- 4Start Date — the first day of the horizon.
- 5Horizon (End Date) — until when to generate.
- 6Notes — free text, optional.
- 7Next — only with the four required fields filled in.
- The End Date must be after the Start Date; H2O refuses to save otherwise (chapter 8).
- Horizons of 3 to 12 months work well: all tickets are created at once, and a long horizon fills the ticket list with Planned tickets. For the next period, create another schedule starting the day after this one ends.
- The field hint says the horizon “can be extended later”; today there is no screen for that — the rule above applies.
Step 2 — Assets and preferred day
Section titled “Step 2 — Assets and preferred day”Choose the Asset Type (UPS, Generator sets, Air conditioning, Switchboards…), tick the assets and give each one its preferred day.
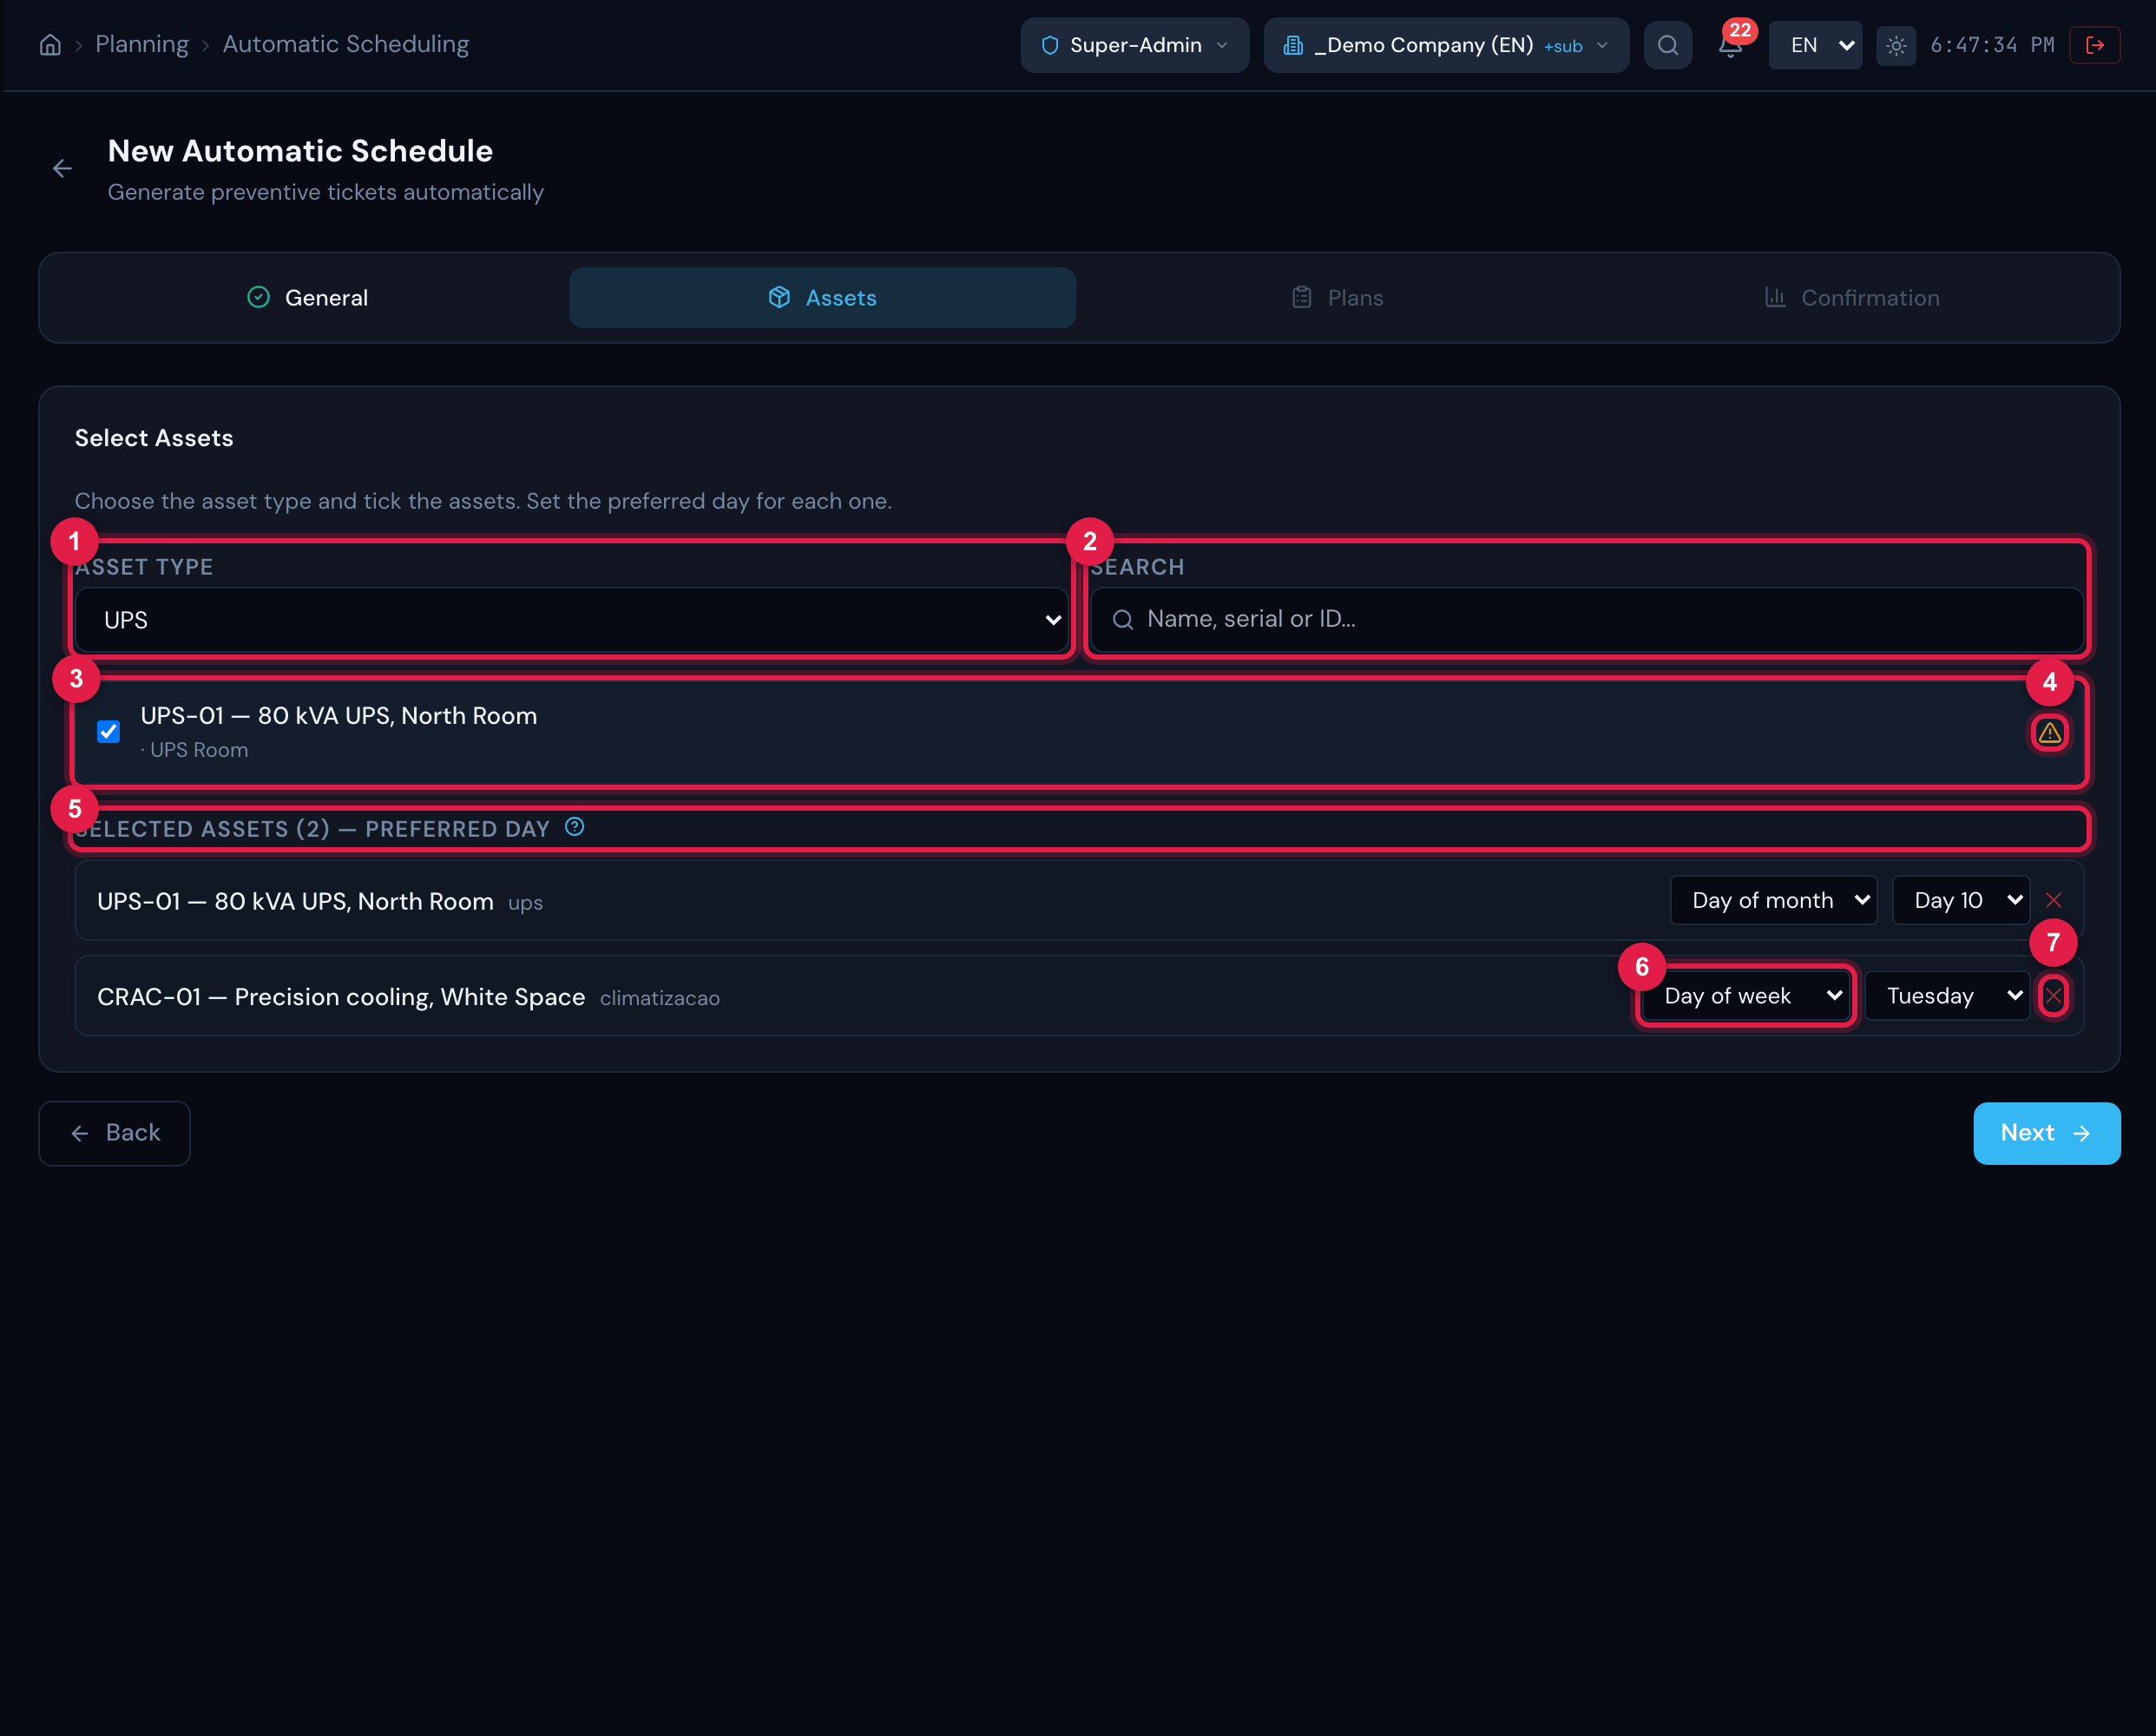
Figure 5. Step Assets: the chosen type, the list of assets with the search and, below, the Selected Assets with each one’s Preferred Day.
- 1Asset Type — one type at a time; the ticked assets are kept when you switch type.
- 2Search — by name, serial number or ID.
- 3A ticked asset — the row shows the serial and the location.
- 4Warning Already in a schedule: … — the asset is already in another Active schedule (hover to see which). You may go on; it is only a warning against duplication.
- 5Selected Assets (N) — Preferred Day: one asset per row.
- 6Day of month (Day 1 to 28) or Day of week (Monday to Sunday).
- 7✕ — removes the asset from the selection.
| Preferred day | How H2O calculates the dates | Use with |
|---|---|---|
| Day of month (1–28) | the first date is that day in the month of the Start Date; if it has already passed, a whole period is skipped. Then the plan’s interval is added, always on the same day of the month. The limit of 28 avoids short months. | Monthly, Bimonthly, Quarterly, Semi-annual, Annual, Custom ≥ 28 days |
| Day of week | the first date is the first chosen day of the week from the Start Date (inclusive); then the plan’s interval is added. | Daily, Weekly, Biweekly, Custom < 28 days |
Spreading the preferred days — UPS on the 10th, switchboards on Wednesday, cooling on Tuesday — distributes the team’s load across the month.
Step 3 — Plans
Section titled “Step 3 — Plans”Plans are ticked per asset family: the wizard shows one block for each family that entered in step 2 (UPS, Generator sets…), and a plan ticked in a block applies to every asset of that family. The same plan may be ticked in more than one family.
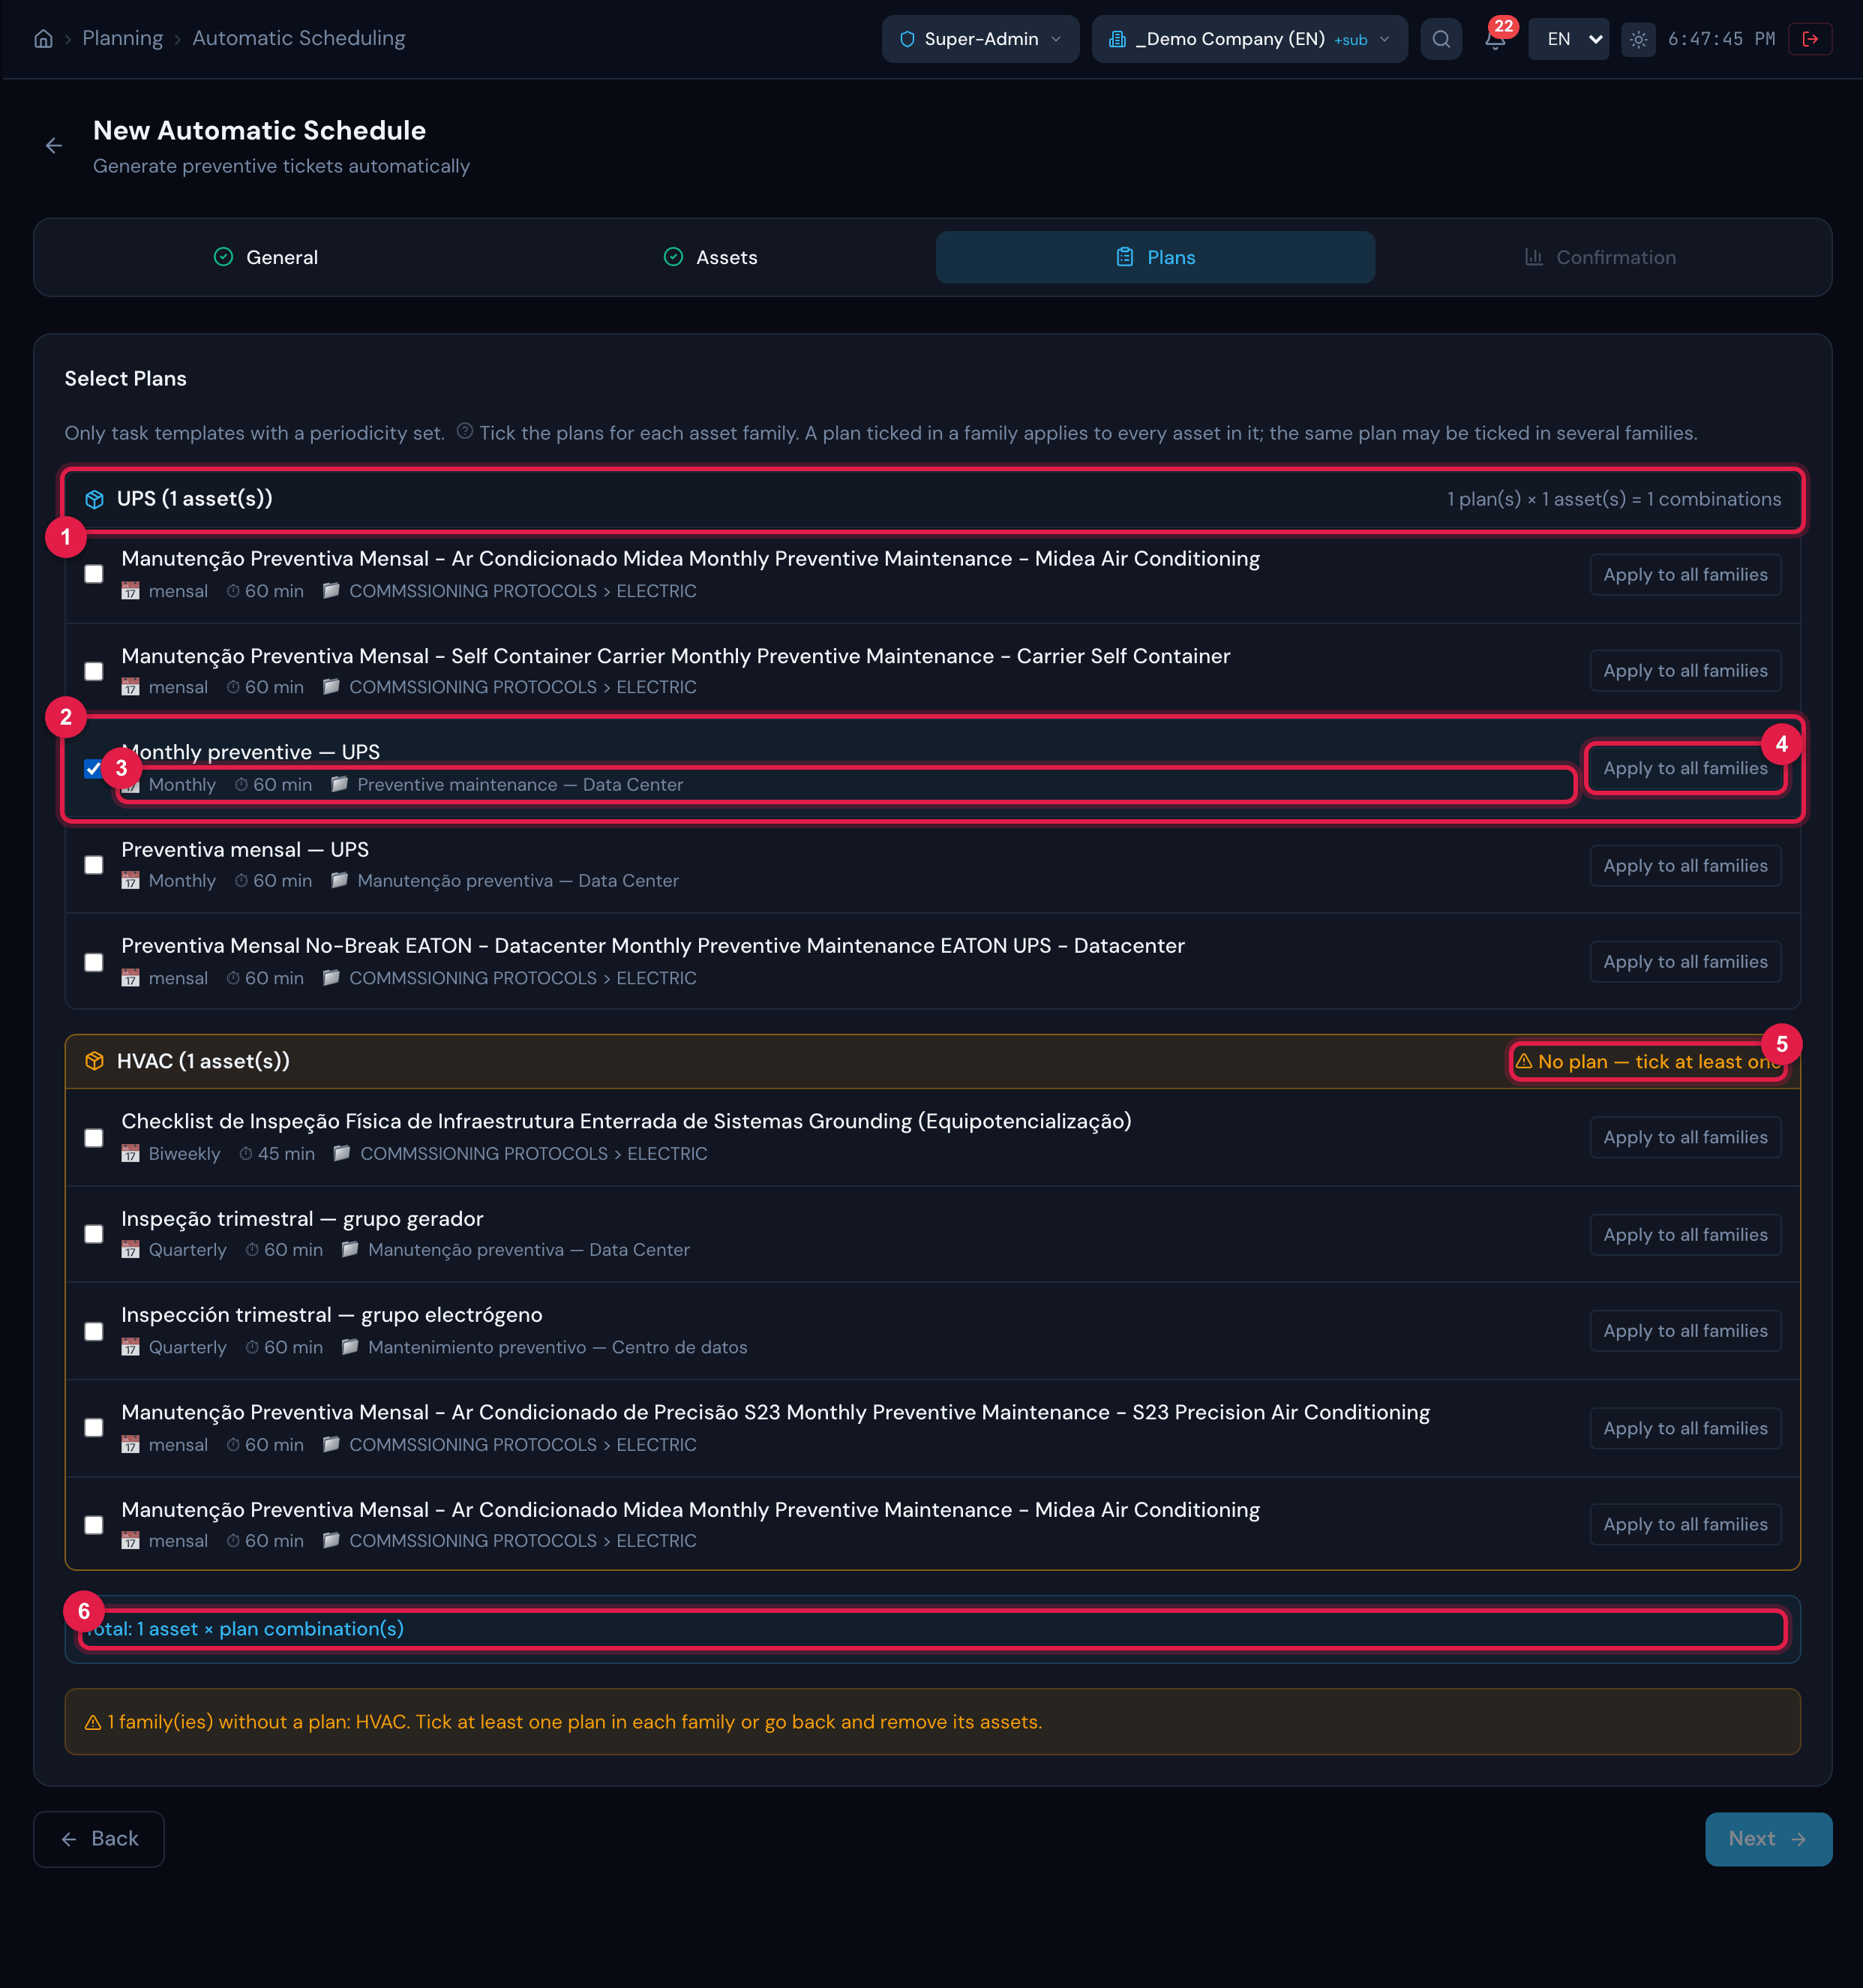
Figure 6. Step Plans: one block per selected asset family, with the templates with a periodicity; a family without a plan is shown in amber; below, the total of combinations.
- 1Family block — UPS (1 asset(s)) — and, on the right, the count P plan(s) × A asset(s) = N combinations of that family.
- 2A plan ticked in that family.
- 3Periodicity, duration and category of the template (chapter 2).
- 4Apply to all families — ticks the plan in every family at once (shown only with more than one family); it becomes In all families — remove when it is already in all of them.
- 5Family No plan — tick at least one (in amber): Next stays locked while a family has no plan.
- 6Total: N asset × plan combination(s) — each combination becomes a schedule item.
If the list comes up empty (No template with a periodicity found), fill in the Periodicity in the templates (chapter 2) and come back. With a family without a plan, the warning N family(ies) without a plan: … asks you to tick a plan in it or go back and remove its assets.
Step 4 — Confirmation and Generate
Section titled “Step 4 — Confirmation and Generate”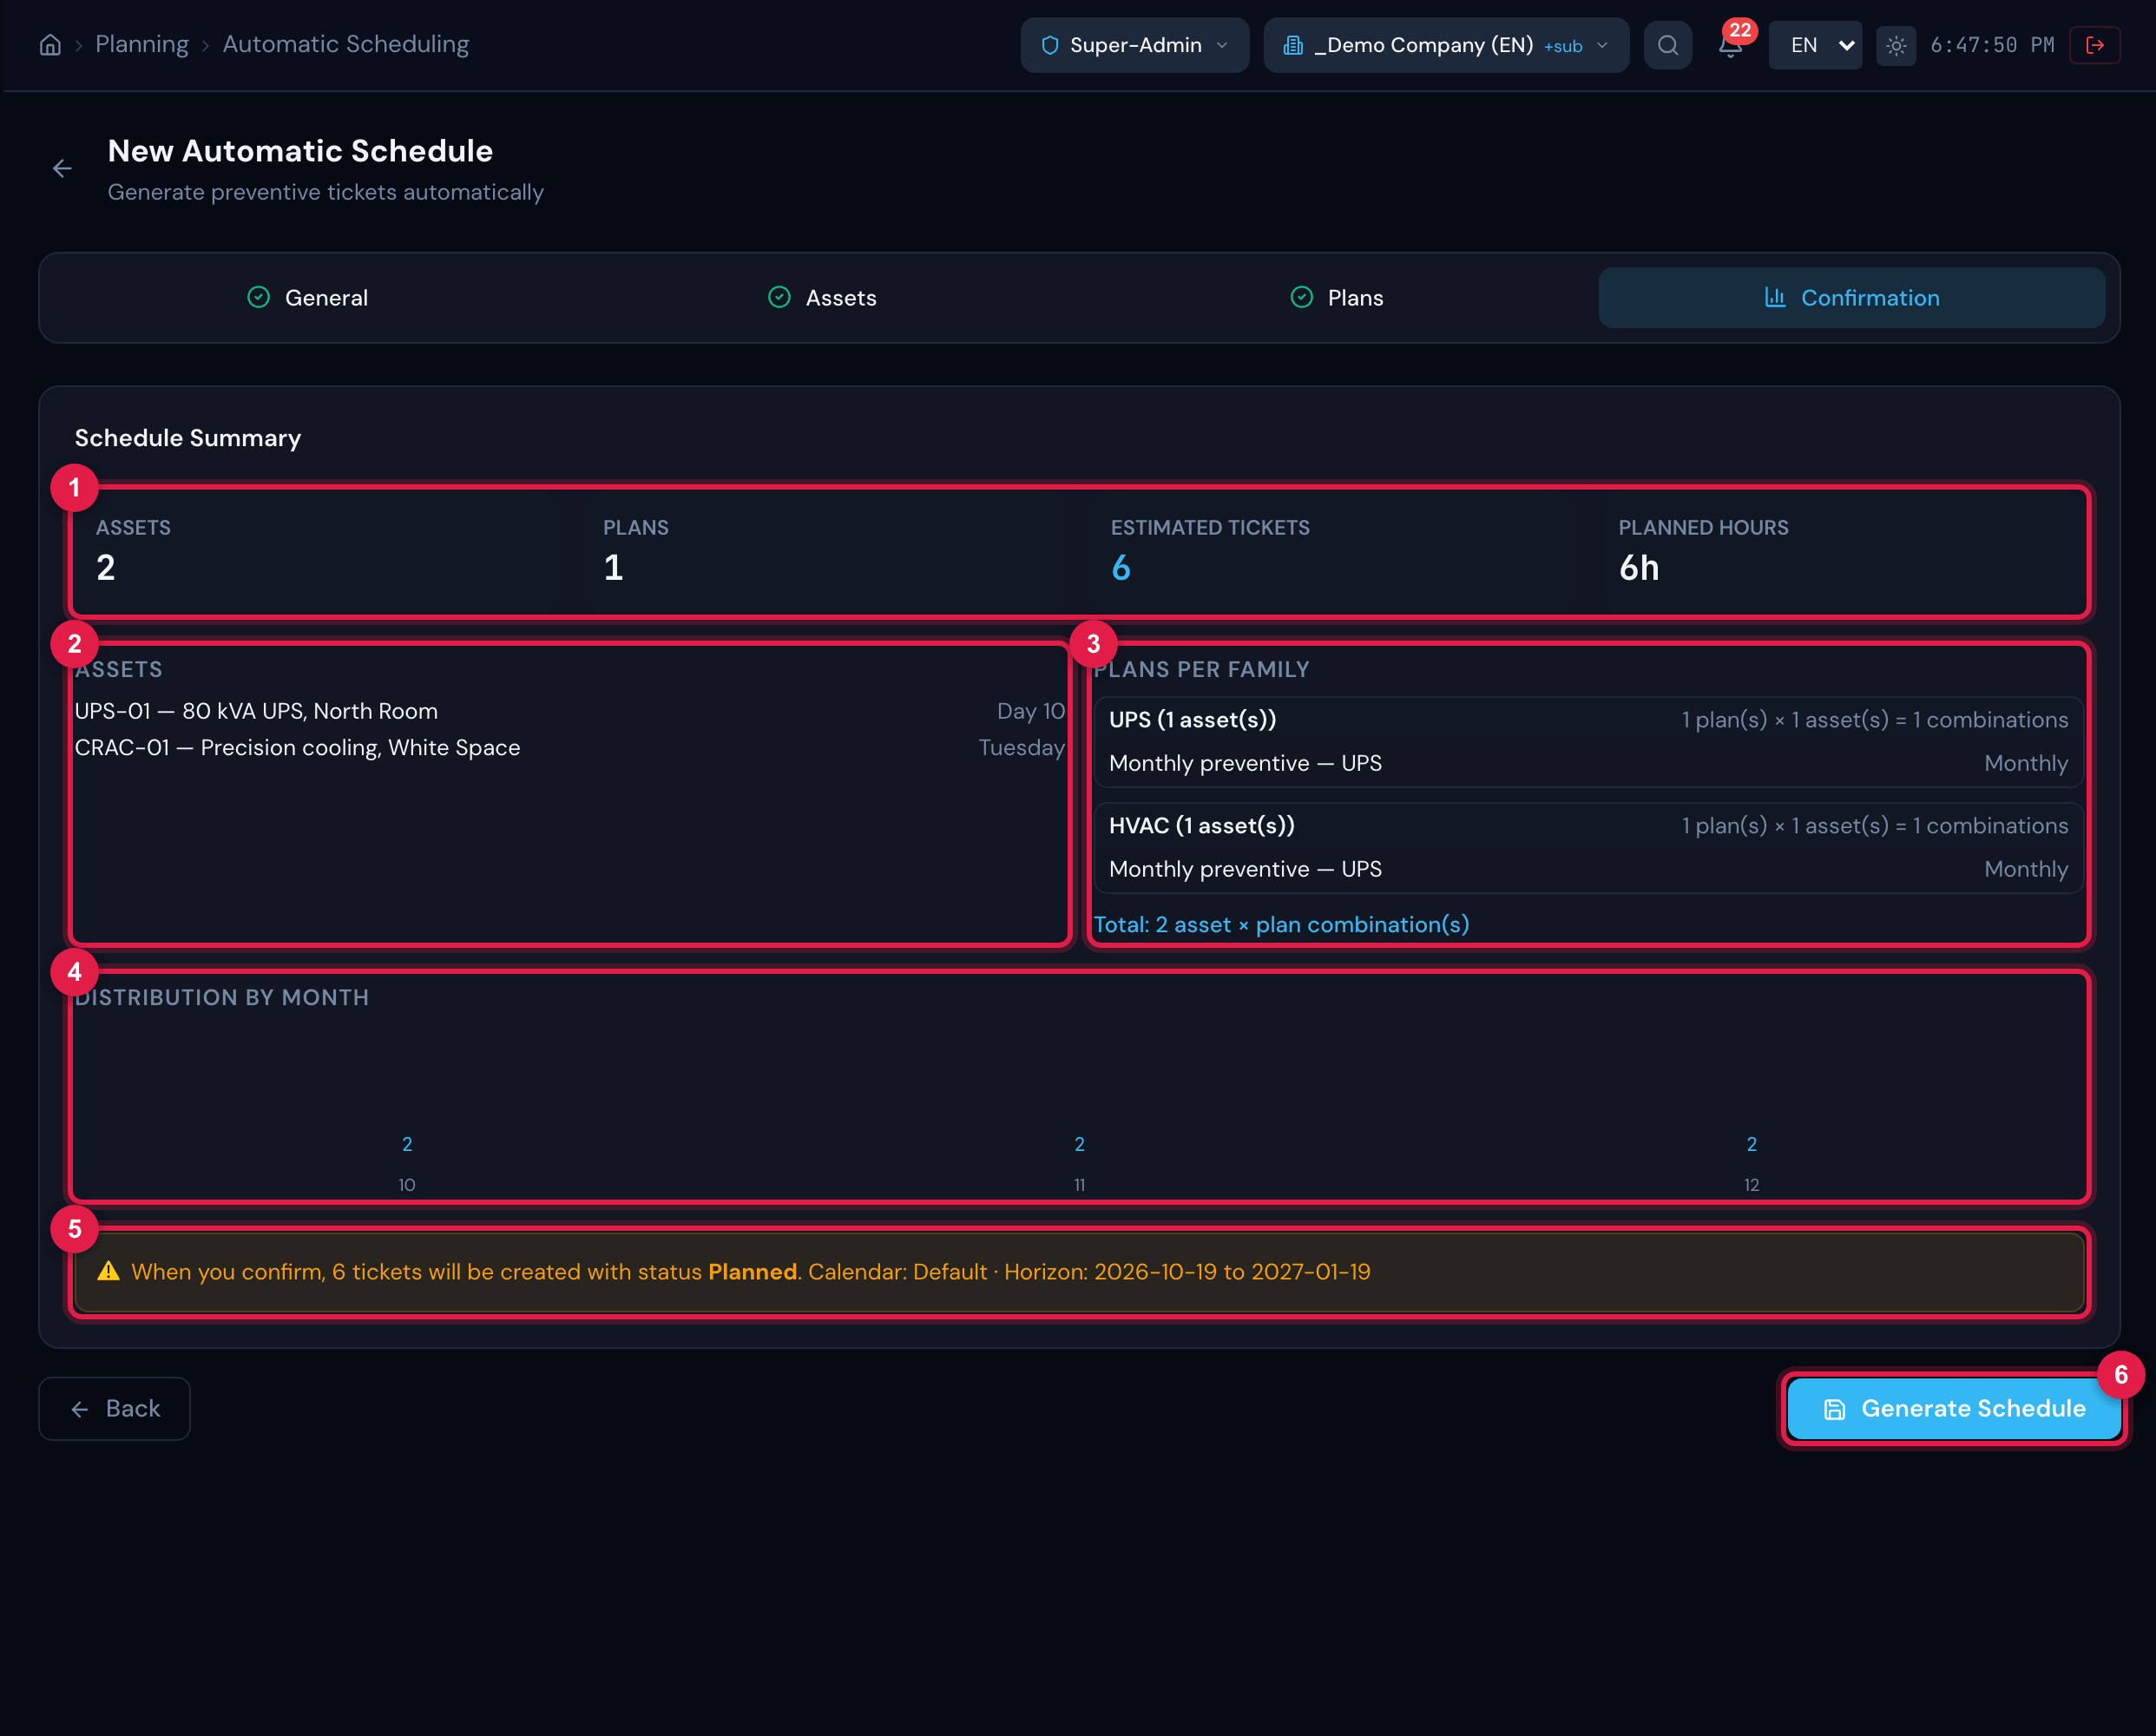
Figure 7. Step Confirmation: the Schedule Summary with the totals, the assets with their preferred day, the plans, the Distribution by Month and the final warning.
- 1Assets, Plans, Estimated Tickets and Planned Hours.
- 2The assets, each with its preferred day.
- 3Plans per family — each family with its ticked plans and the combinations count; below, the total.
- 4Distribution by Month — how many tickets per month, by the estimate.
- 5Warning: When you confirm, N tickets will be created with status Planned. and the chosen calendar and horizon.
- 6Generate Schedule — saves and creates all the tickets.
- Estimated Tickets and Distribution by Month are an estimate of the screen: it counts 30-day months and ignores the preferred day and the calendar. The real number appears in the message Schedule created! N tickets generated. and on the schedule page (chapter 5). Differences of one or two tickets per item are normal.
- Planned Hours = tickets × plan duration (30 min when the template has no duration).
- When you click Generate Schedule, H2O saves the schedule, the items and all the tickets in a single operation: either everything is saved, or nothing. It then opens the schedule page.
- Generation sends no notification to anyone: the ticket is born with no technician assigned and no requester other than the person who generated it. The plan’s technician goes on the task (chapter 4).
- Check the site in the header and click New Schedule.
- Fill in Name, Calendar, Start Date and Horizon and click Next.
- Choose the Asset Type, tick the assets and adjust each one’s Preferred Day. Next.
- Tick the plan (preferably one per schedule). Next.
- Review the summary and click Generate Schedule.
Was this page helpful?
Thanks for the feedback!
Got it — we will improve this page.