
Assets in the app
Manual — Assets · chapter 11 of 12
The H2O app (phone, tablet and desktop) takes the assets to the field: look up the record without internet, scan the label QR, open a ticket for the equipment, take photos, register and edit, record readings, record a component replacement and print the label on a Brother printer. Everything done in the app stays on the device and goes up at the next sync — see Sync and working without internet in the Getting started — H2O app manual.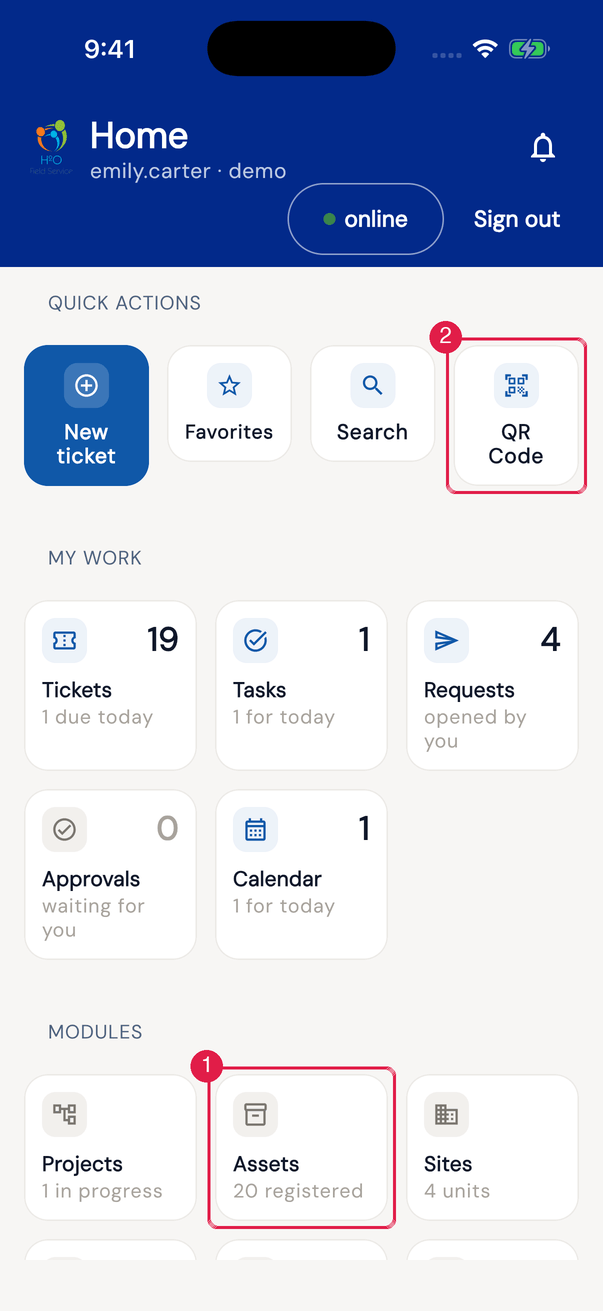
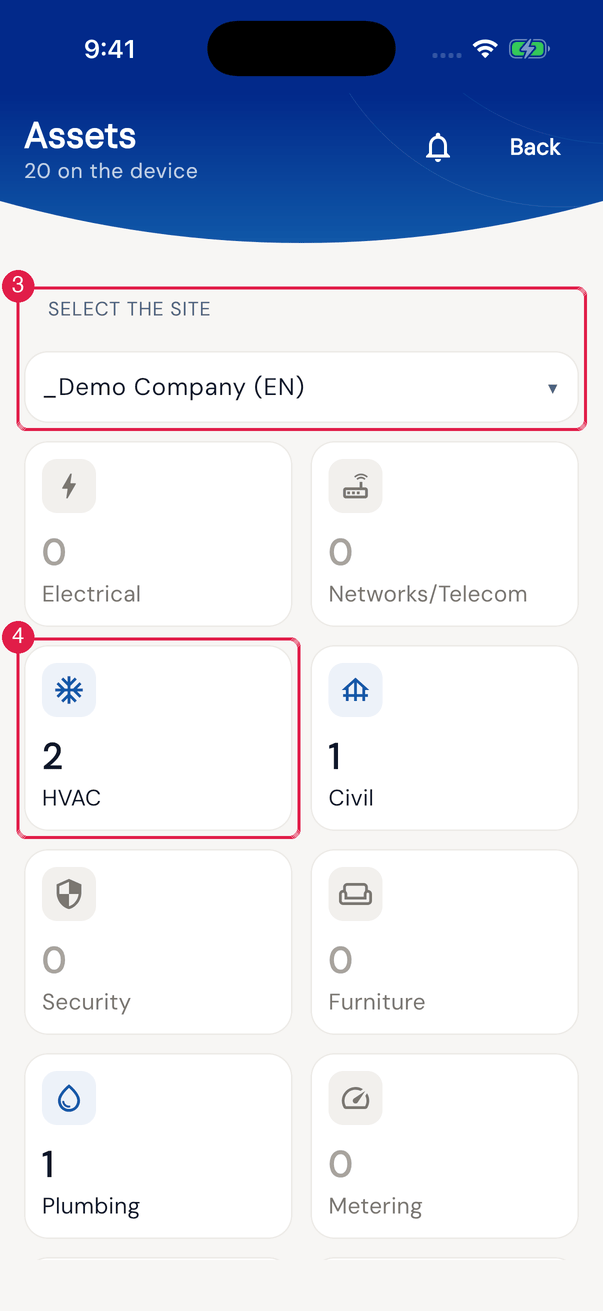
App H2OFigure 26. In the app, assets open from the Assets card on the home screen. Choose the site (the field searches as you type) and tap a category — even an empty one, which is where you register its first asset.
- 1Assets card in Modules.
- 2QR Code in Quick Actions.
- 3Select the Site.
- 4Category card with the number of assets in the site.
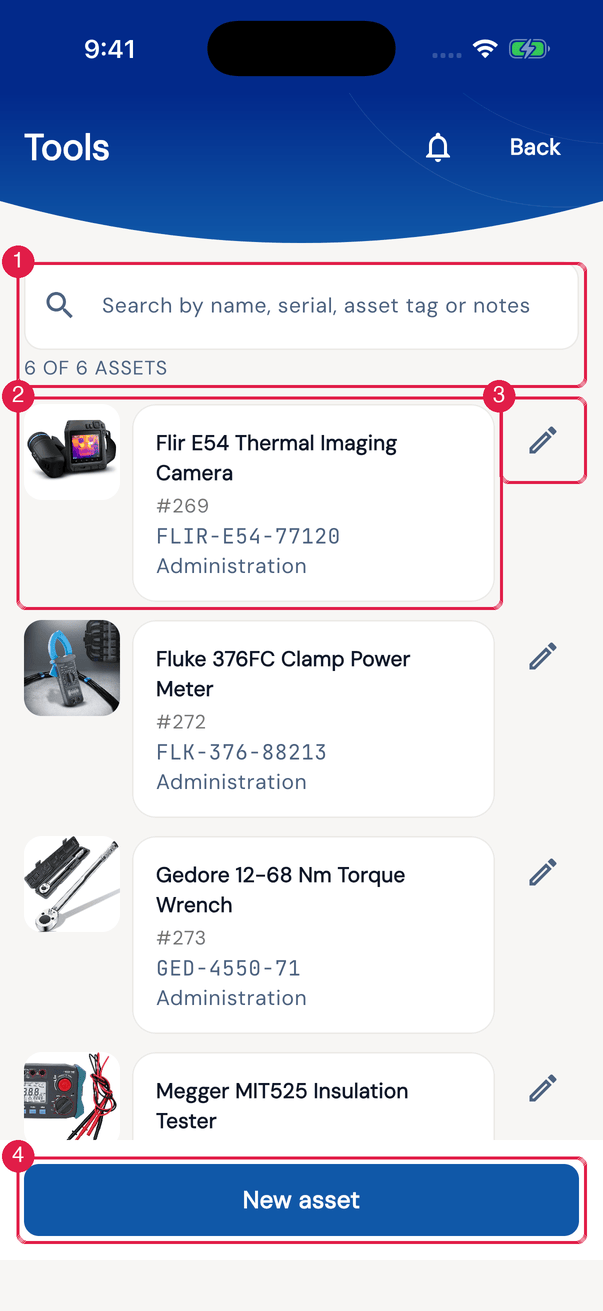
App H2OFigure 27. The list of a category: the search and the count at the top; on each card, the photo, the name, the number, manufacturer · type and model · serial (when filled in) and the location — the Pending badge only appears while the record has not been uploaded; the pencil edits and New asset registers.
- 1Search and the “N of M assets” count.
- 2Asset card — tap to open the panel.
- 3Pencil: edit the registration.
- 4New asset.
The asset panel
Section titled “The asset panel”The top of the panel is a status card: the photo (tap to change it), the badges Preventive up to date or Preventive overdue, N open ticket(s), the tag and the sync badge, and the line “last preventive … · next …” with the cycle bar. Below, the tabs as pills: Information, Statistics, Metering, Components, Documents, Corrective, Preventive and Others.
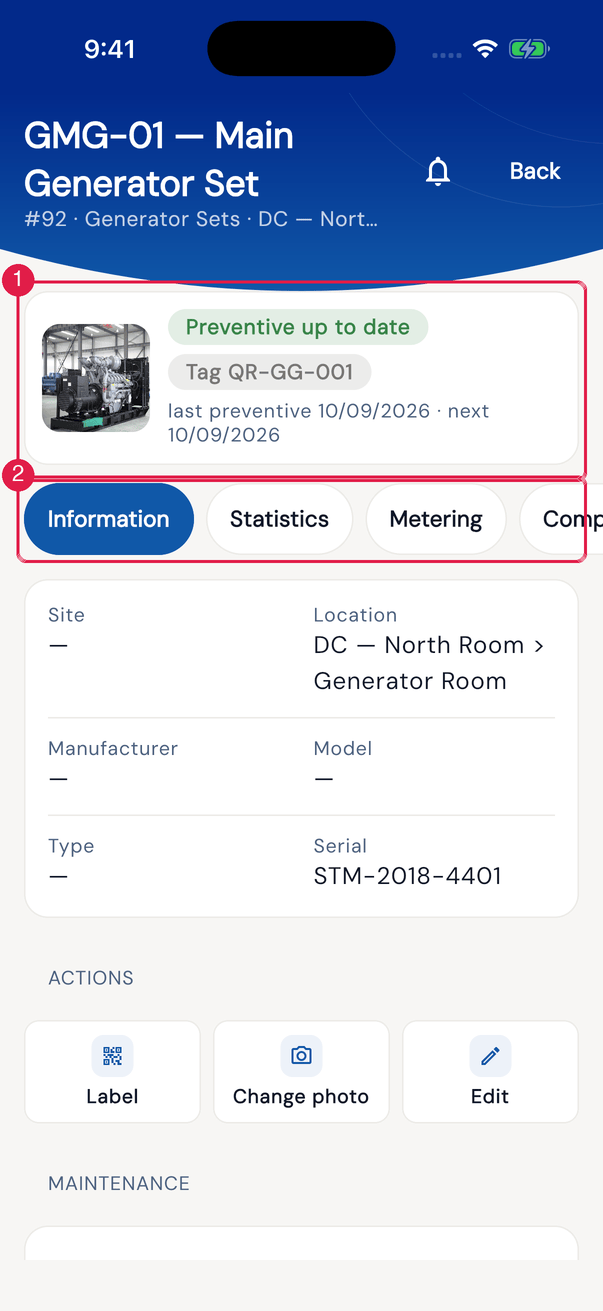
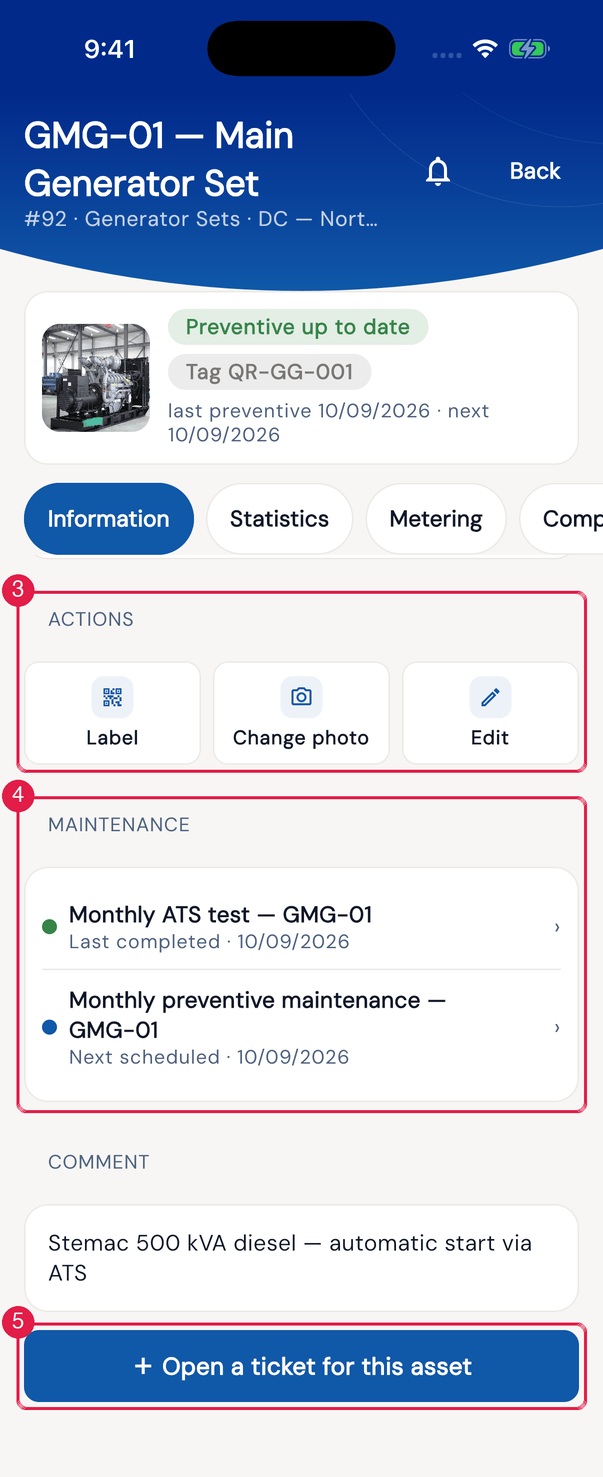
App H2OFigure 28. The generator set panel in the app. The Actions are Measure (only in the Metering category), Label, Change photo and Edit. Maintenance lists the last completed preventive, the next scheduled one (red if overdue) and the open tickets; tap to open.
- 1Status card: photo, badges and the preventive cycle bar.
- 2Tabs as pills.
- 3Actions: Label, Change photo, Edit.
- 4Maintenance list.
- 5+ Open a ticket for this asset.
- Open a ticket for this asset: choose the Modality (it fills in the beginning of the title), check the Title, write the Description, choose the Priority and tap Open a ticket. The ticket is queued (“Ticket queued — uploads on next send”).
- Change photo: choose Camera or Gallery. The footer button becomes Refresh — tap it to send the new photo (“Sent successfully!”).
- Statistics: registration date, availability and total downtime, and the numbers of preventive tickets (planned, completed, scheduled, next and last) and corrective tickets (requested, completed, in progress, last).
- Documents: the documents linked to the asset, with Download and open. When you open the tab, the app already downloads the missing ones — the technician goes down to the basement with them on the device.
- Corrective, Preventive and Others: the asset’s open tickets in each modality group.
Registering and editing in the app
Section titled “Registering and editing in the app”In the category list, New asset (or the pencil, to edit) opens the form: photo (“Tap to take a photo”), Site, Name (required), Serial number, Tag / Asset #, Location, Manufacturer, Model, Type (the four lists accept creating a new item) and Comment; then the category’s additional fields, in the same sections as on the web. The choice fields — tool category, meter type, elevator transport type, PPE category — are lists with the server’s options; the PPE Size suggests the options and accepts free text. The yes/no fields — Requires Calibration of tools, Create Ticket on Anomaly of metering — are Yes / No switches. Read-only fields (such as the PPE delivery) do not appear. Tap Register asset (or Save changes).
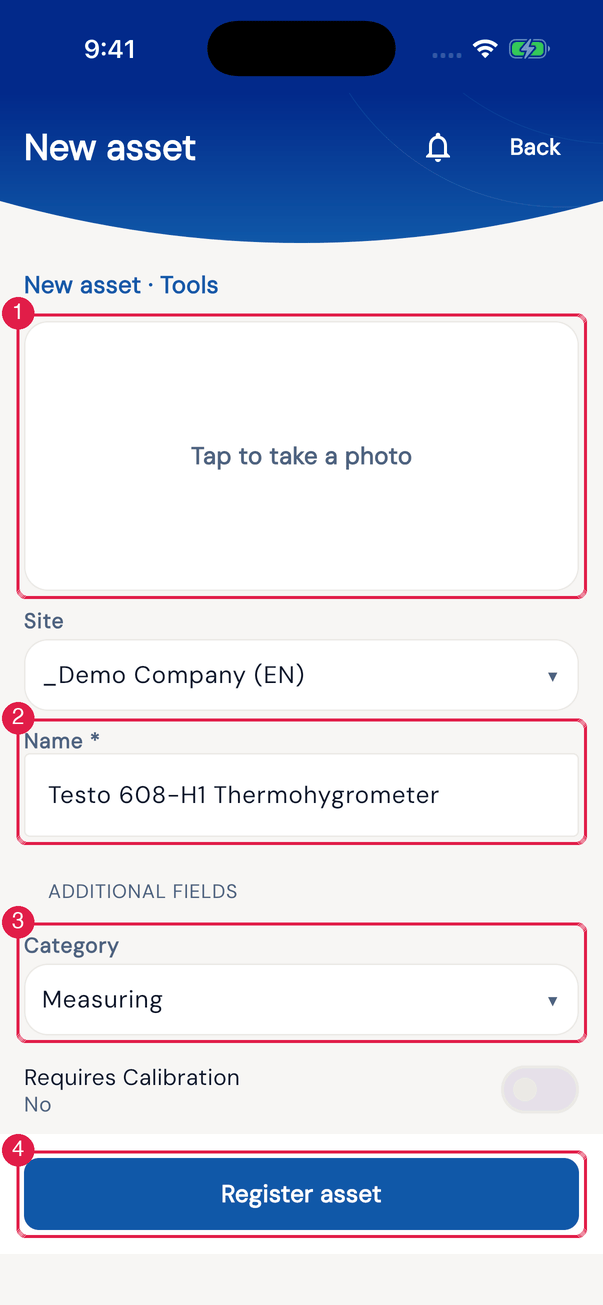
App H2OFigure 29. New asset · Tools form: photo, Site, Name and, in the additional fields, Category chosen from the list of options and the Requires Calibration switch (the image omits the fields in between, from Serial number to Comment).
- 1Photo — Camera or Gallery.
- 2Name (required).
- 3Choice field as a list (Category).
- 4Register asset.
Scanning the label QR
Section titled “Scanning the label QR”Tap QR Code (Quick Actions on the home screen) and point the camera at the label. The lookup is done on the device, without internet: if the asset is synced, the panel opens directly.
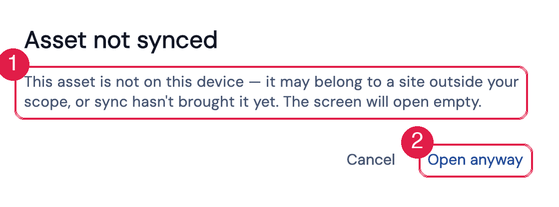
App H2OFigure 30. The Asset not synced warning, with Open anyway, for the label of an asset that is not on the device. This screen is from the desktop, where the label code is typed (or read by a USB reader); on the phone and the tablet, the camera reads the QR and the warning is the same.
- 1Explanation: “it may belong to a site outside your scope, or sync hasn’t brought it yet”.
- 2Open anyway — the panel opens empty.
| What appears | Why |
|---|---|
| The asset panel | The asset is on the device. |
| Asset not synced (Open anyway / Cancel) | The label is from H2O, but the asset has not come down to the device (another site or sync pending). |
| Asset label scanned, but this asset is not on this device. Sync and scan again. | The label is an asset label, but the app could not identify it — for example, the label of an asset registered without internet on another device, which has not come down to this one yet. |
| This is not an asset label. | The QR scanned is not an H2O asset. |
Components in the app
Section titled “Components in the app”The Components tab shows each part with the replacement forecast (On time, Due soon · N d, Overdue by N d, or the usage left), the dates and readings, Replace, Edit and the replacement History. + New component registers one (free or Link existing asset), with the same Replacement forecast as the web (No tracking, By time, By usage, Time and usage). In the replacement, enter Type, Reason, Ticket, the Reading at replacement (usage tracking) and the New component data; the app reminds you that “The replacement restarts the cycle: installation becomes today and the next replacement is recalculated from the lifespan.” Tap Save replacement.
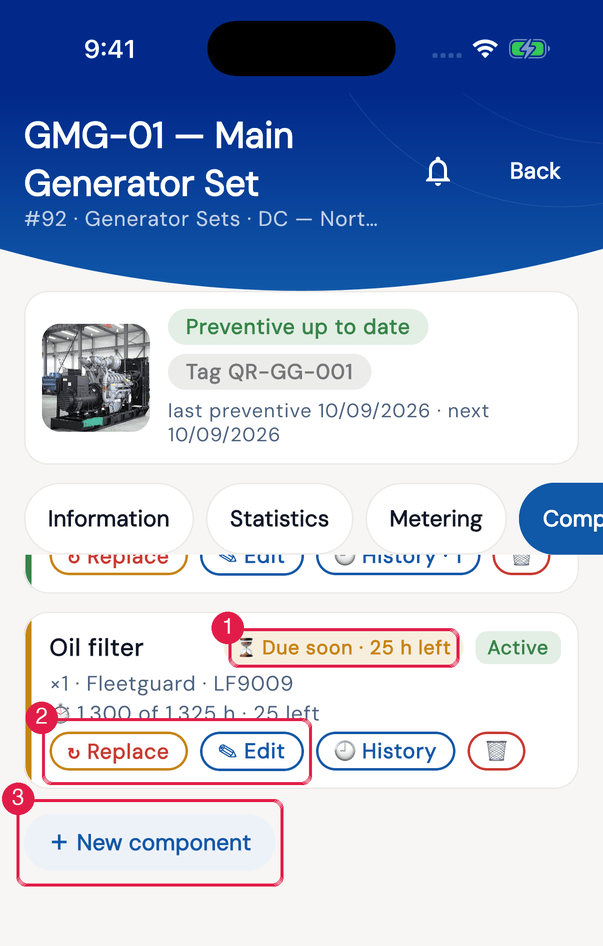
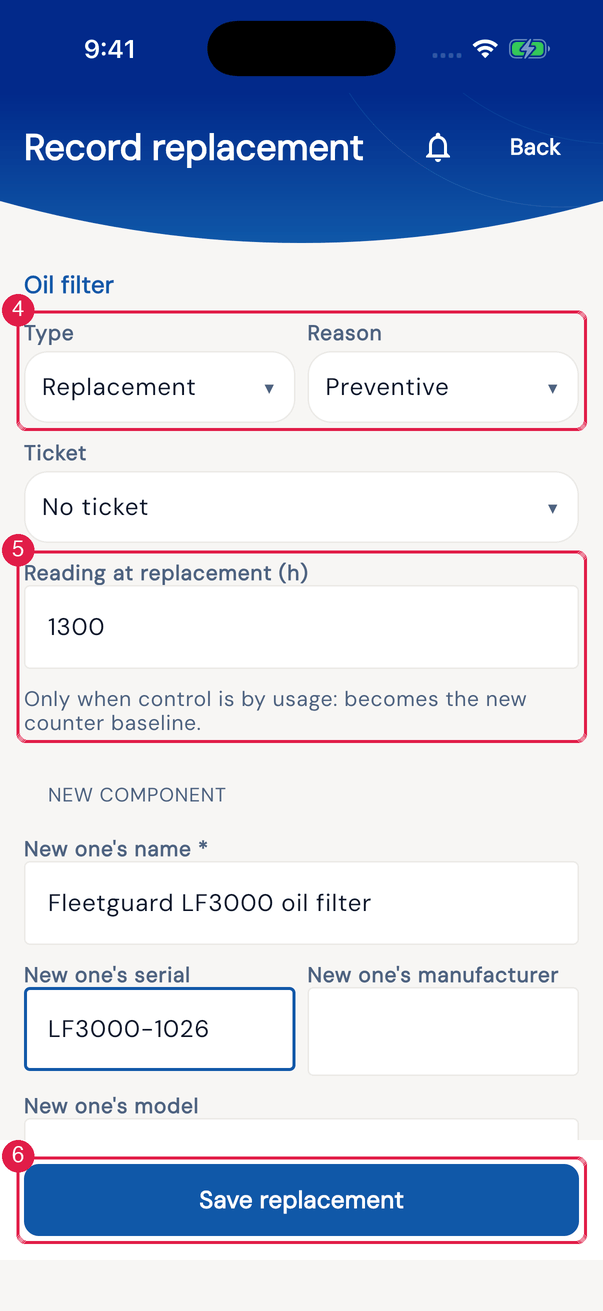
App H2OFigure 31. Components of the generator set in the app and the recording of a replacement. Removing a component takes it off the list immediately; on the server, it is removed at the next send.
- 1Forecast badge (e.g. Due soon · 25 h left).
- 2Replace and Edit.
- 3+ New component.
- 4Type and Reason of the replacement.
- 5Reading at replacement — becomes the new counter baseline.
- 6Save replacement.
Metering in the app
Section titled “Metering in the app”The Metering tab shows the charts by group (metrics with 2 readings or more) and one card per metric, with the latest reading, the range and Record reading. + New metric creates a metric (Metric and Unit required, Group, the ranges Expected minimum, Expected maximum, Critical minimum, Critical maximum and Cumulative) and Apply pack applies a pack downloaded from the server. In the reading, enter the Value and the Notes and tap Save reading. The anomaly analysis and the automatic ticket happen on the server when the reading goes up (chapter 6).
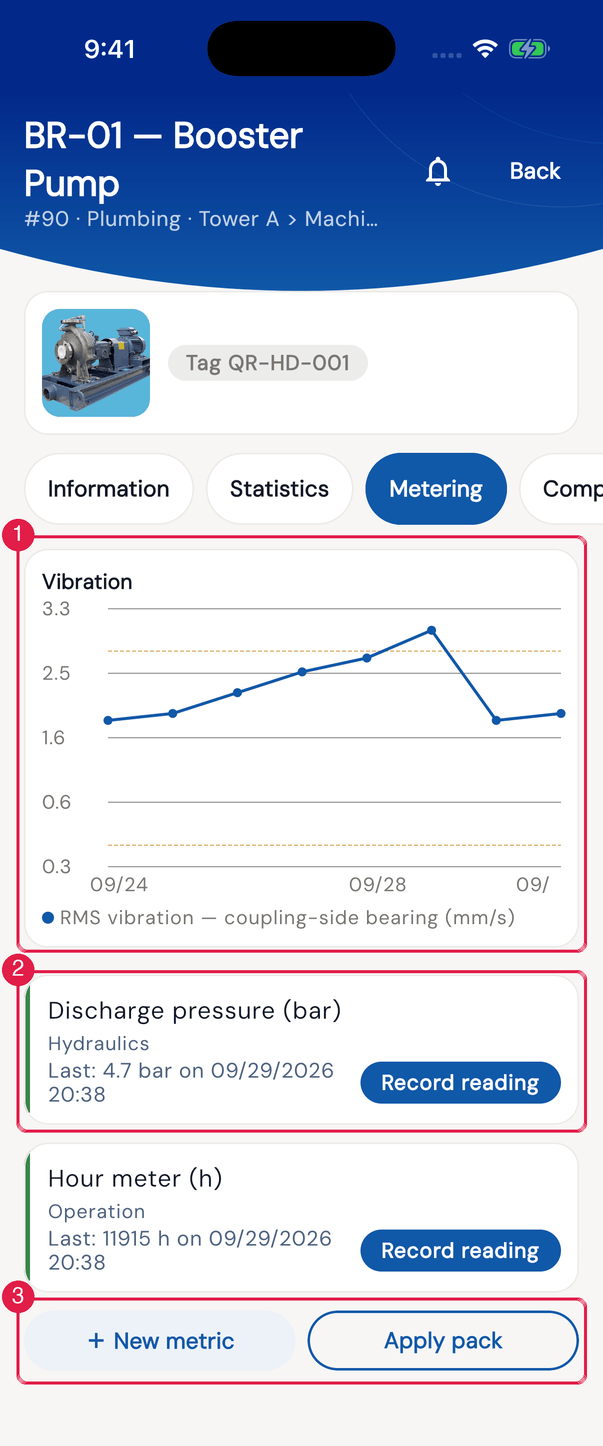
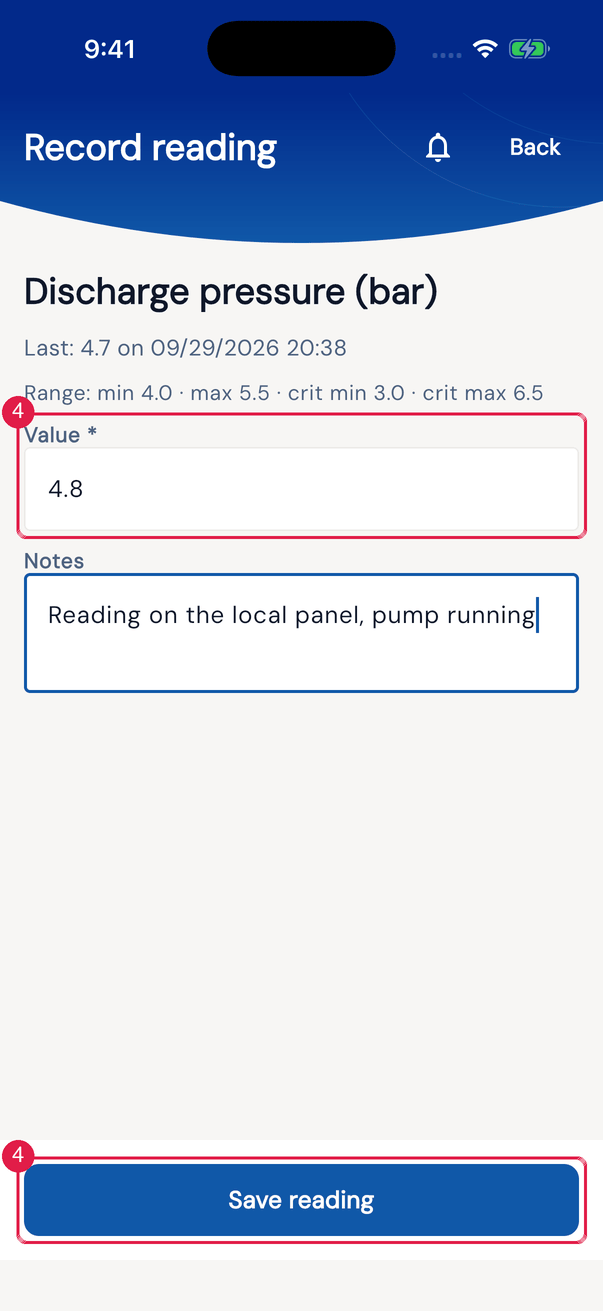
App H2OFigure 32. Metering of an asset in the app. In the Metering category, the record’s Measure shortcut records the value directly: with one metric, it goes to it; with several, it asks which one; with none, it creates the metric with the name of the asset’s Type (or “Leitura”) and saves the reading right away.
- 1Group chart.
- 2Metric card with the latest reading and Record reading.
- 3+ New metric and Apply pack.
- 4Value and Save reading.
Printing the label in the app (Brother)
Section titled “Printing the label in the app (Brother)”In Actions › Label, the app shows the asset’s QR and prepares the label for Brother tape printers. Choose the tape (12 mm, 18 mm, 24 mm or 36 mm — continuous tape: the length grows with the text, nothing is cut) and the Logo (Site, Root or None); the Label preview is the image that goes to the tape.
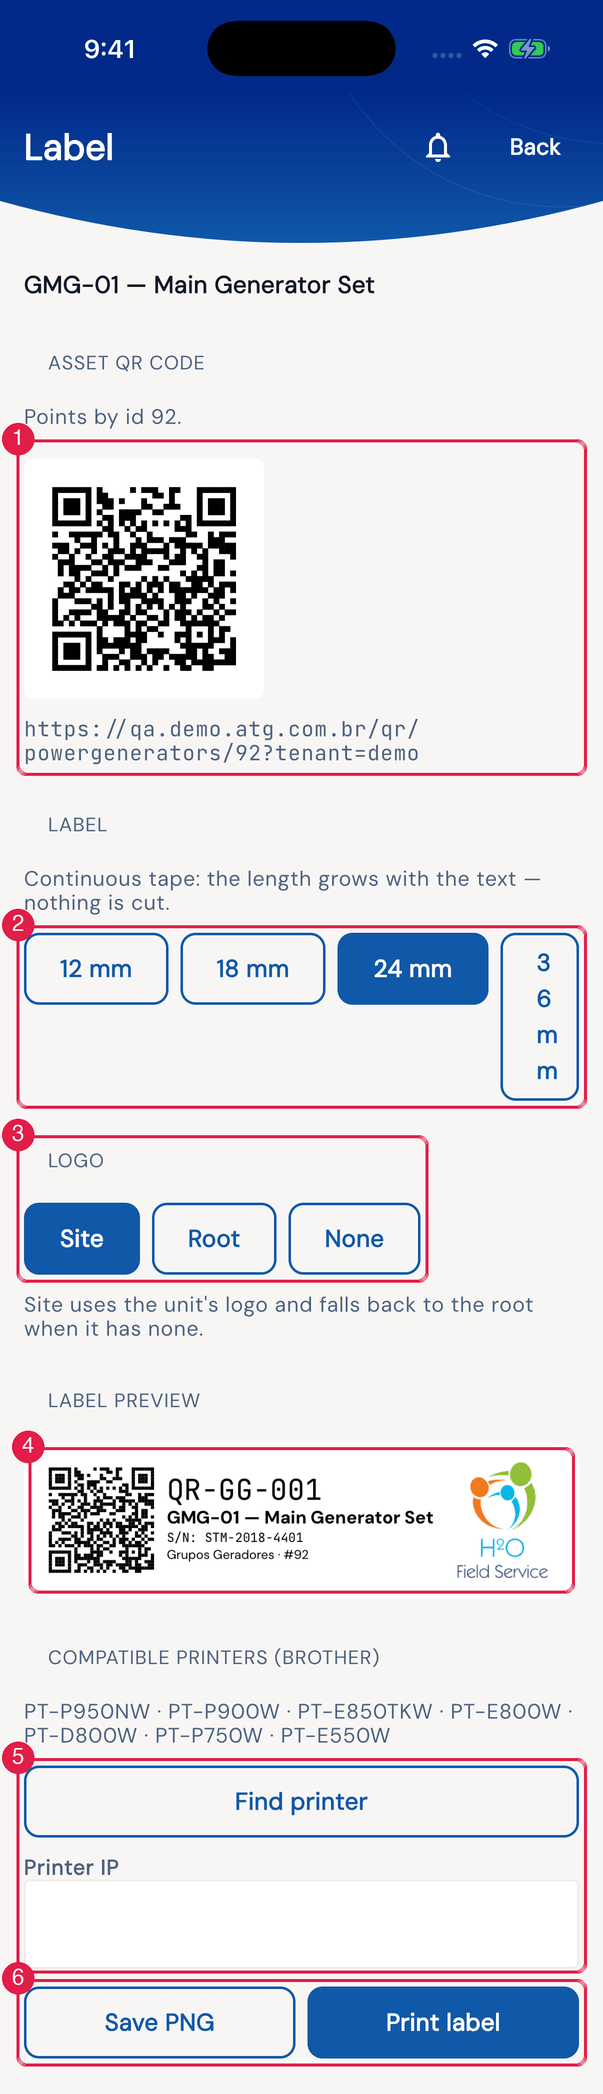
App H2OFigure 33. The label screen: asset QR, tapes, logo, the preview and, below, the compatible printers, Find printer, Printer IP, Print label and Save PNG.
- 1Asset QR and the encoded address.
- 2Tapes 12 mm, 18 mm, 24 mm, 36 mm.
- 3Logo: Site, Root or None.
- 4Label preview.
- 5Find printer / Printer IP.
- 6Print label and Save PNG.
- Turn the printer on in the same network as the device and tap Find printer — or type the Printer IP (the most common way on a construction site, with a fixed IP).
- Tap Print label. The app confirms “Label sent” with the size in pixels.
- Without a printer, Save PNG saves the label image on the device.
Was this page helpful?
Thanks for the feedback!
Got it — we will improve this page.